
how to build pyramidal photo video light reflectors for about $5 each
Copyright © 2011 by KV5R. Rev. Sep. 4, 2011
Shop for softbox studio lights here.
I wanted to stay all homemade with my photo-video accessories, but alas, you can buy a decent photo light stand and socket for $18, and there’s no way you can build them that cheaply. But soft-boxes and other reflectors and diffusers are a different matter—reflective and shoot-through umbrellas are cheap enough (~$15/ea.), but the former isn’t diffused, and the latter bounces 50%+ of your light the wrong way. The solution is the soft-box, which is a reflector and a diffuser, giving you that “soft” light that eliminates hard shadows. But decent soft-boxes are $100 and up!
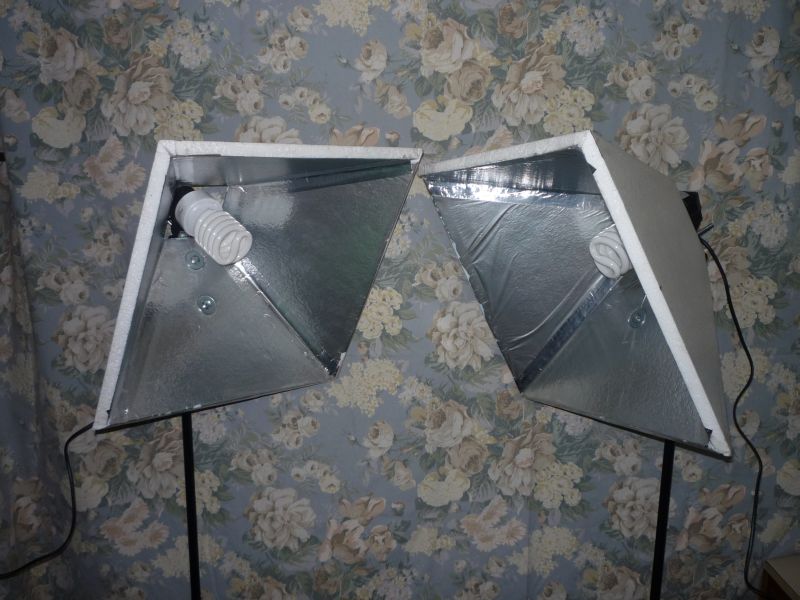
My plan was to design and build soft-box-type lights using foil-backed rigid foam insulation. I did so in the last article, but they had two sides that didn’t reflect outward, and they were not mountable on light stands. So I went back to the drawing board (again) and decided to build pyramidal reflectors that would reflect all the light one way, and also mount on standard photo light stands. But I didn’t realize that doing so required math (trig) that is beyond my abilities.
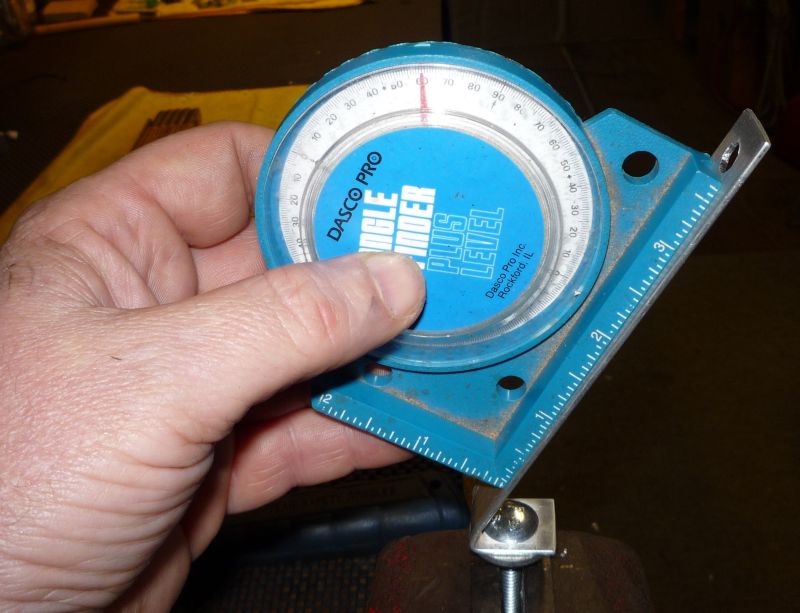
There’s the answer at the bottom, 70.52°.
The bevel angle is ½ that.
Courtesy Jürgen Köller,
German Mathematician, Retired.
To the internet we go, looking for pyramid plans with cut angles provided. What I found was a myriad of sites about paper pyramids, incomprehensible (to me) pyramid math formulae, and how to build roofs on houses. None of them pulled all the variables together in one place! Then I found this excellent page and it had everything I needed except the bevel angle to miter the four upper corners. Then I located an online pyramid calculator that provides compound saw angles for pyramids.
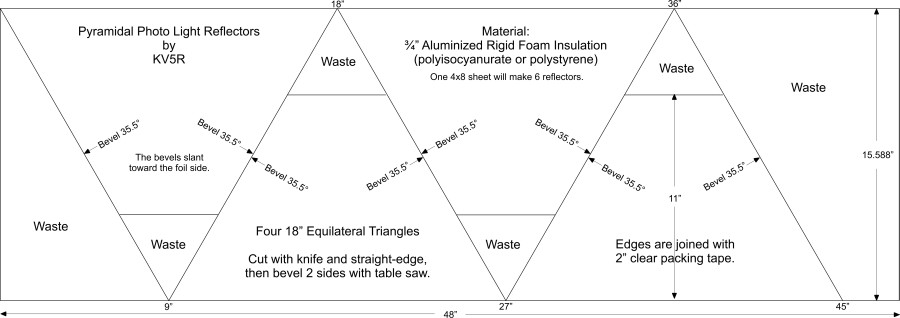
Since I already had a couple pieces of the aluminized polystyrene cut to 16×48 inches, I used 16 as the slant height and made two pyramids with 18 inch equilateral triangles. That’s when I realized I didn’t know what angle to use to bevel the corners! And the material should have been 15.6, not 16.
Notes
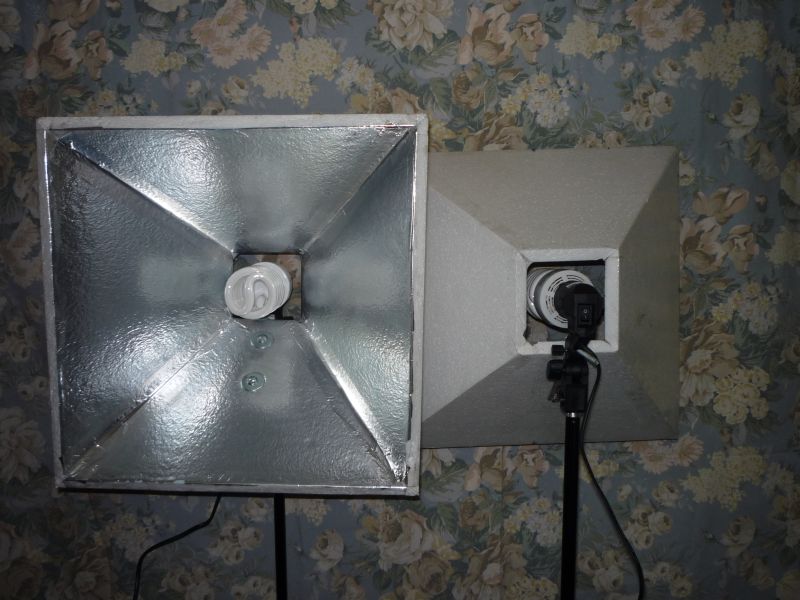
I will use the terms top and bottom to refer to what will become the front and back of the reflectors—id est, the bottom (front) is the (big) diffuser end, and the top (back) is the (small) light fixture end. Since pyramids typically sit on their bases, it is conventional to refer to the big end as the base or bottom.
I could just pop in the numbers, like a recipe, but if you’re like me and don’t have the math skills, how could you build other sizes? So I will attempt to explain the math in a way you can just pop it into Google search and calculate it (did you know the Google search input field is also a scientific calculator? Try it!) And, if you experts will kindly pardon me, I’ll not use any complex mathematical notation because (1) it’s too hard to code in HTML, and (2) many people don’t know what to with it.
Design
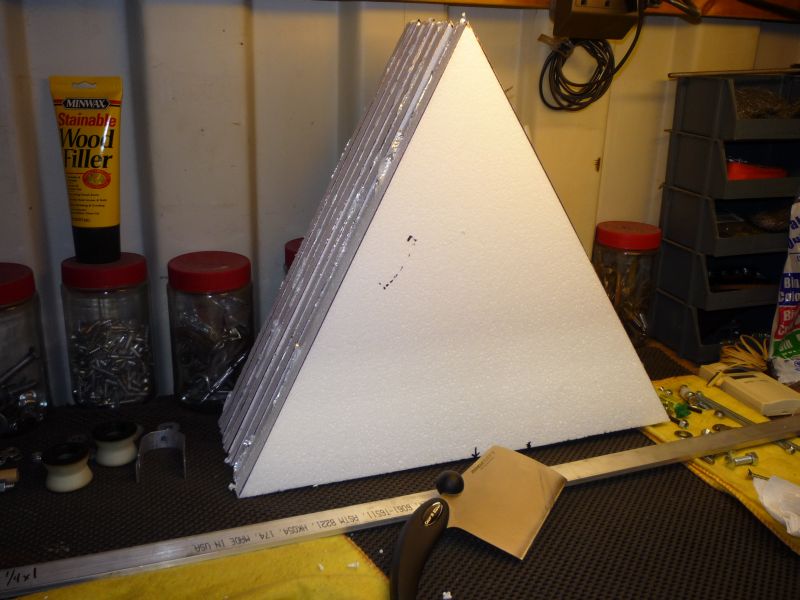
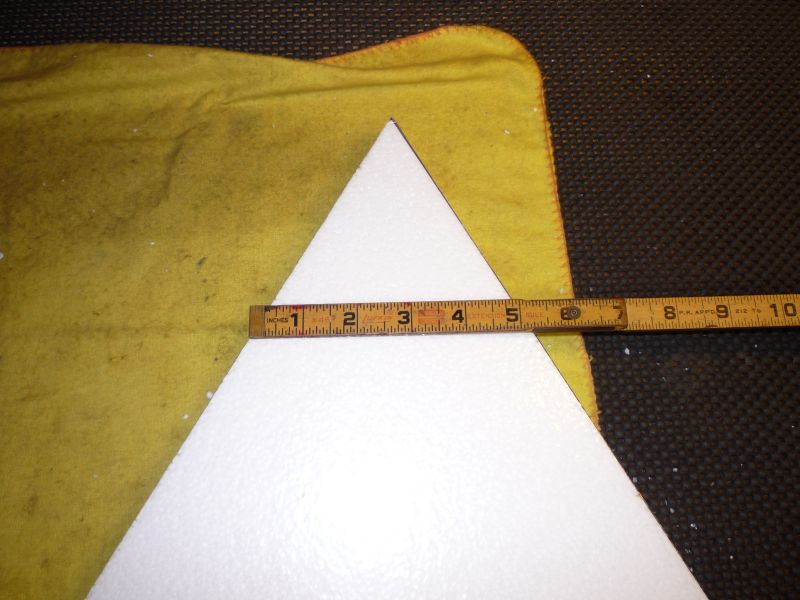
The ones I built are 18 inches square on the base, and the sides are 18-inch equilateral triangles, making the pyramids 11.3 inches high. I then made the brackets, measured the light socket, and determined how much to cut off the top to allow clearance for the light fixture and 45-watt CFL. Cutting off the top left them about 9 inches high, which is more than enough.
The measurements in question are lengths and angles. Unless specified, lengths are in inches (2.54cm), and angles are in degrees.
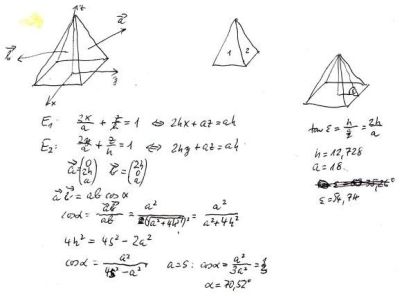
- a = the length of one side of the base.
- h = height, from the center of the base to the apex.
- h′ (h prime) = height of one side, from the middle of one base edge to the apex (some call this the slant, slope, or triangle height).
- s = the length from one corner of the base to the apex (some call it the length of the lateral ridge).
- Some sites and formulae also use r or d, the base radius from center to corner. For square bases, this is base length × .707.
- ε (epsilon) = the internal angle (in radians) between the base and the sides (some call this the slant or slope angle).
- The upper angle (between vertical and a side) will of course be 90−ε (in degrees), and twice that angle will be the apex angle.
- α (alpha) = the internal angle between adjacent sides, on the plane perpendicular to the sides (some sites call this Φ (Phi)).
- ½α (half alpha) = the bevel (chamfer) angle to saw and miter-join the corners; (some sites call this Θ (Theta)).
- The angle of the opening of the reflector (bottom of the pyramid) will be 180−(2ε in deg.), 70.52°. Wouldn’t a 90° opening be better to reflect the sides of light straight forward? No, that would create a hot-spot (of light) on the diffuser! 70° seems to be about right to evenly illuminate the diffuser cloth. Besides that, a 90° reflector gets too shallow to contain a big CFL, unless it’s very large.
Construction
For a pyramidal reflector with four 18-inch equilateral triangle sides:
- Each light reflector is made of ¾-inch rigid foam insulation. It is available at building supply stores for around $10 per 4-by-8-foot sheet. There are two types: aluminized-plastic-faced polystyrene (R-Gard), and aluminized craft-paper-faced polyisocyanurate (Rmax R-Matte+). The latter is much more desirable because it’s stronger and it cuts cleaner. You can also use Foam Core or Coroplast, but they are (1) much more expensive and (2) not aluminized.
- If the foil side as printing on it, remove it with alcohol and paper towels. Don’t rub too hard, else the foil may detach from the core.
- Cross-rip cut (one each per light) making a piece 15.6 by 48 inches.
- Along one long edge measure and mark 18 and 36 inches. Along the other edge mark 9, 27, and 45 inches. Connect the dots with a straight-edge and felt-tip marker.
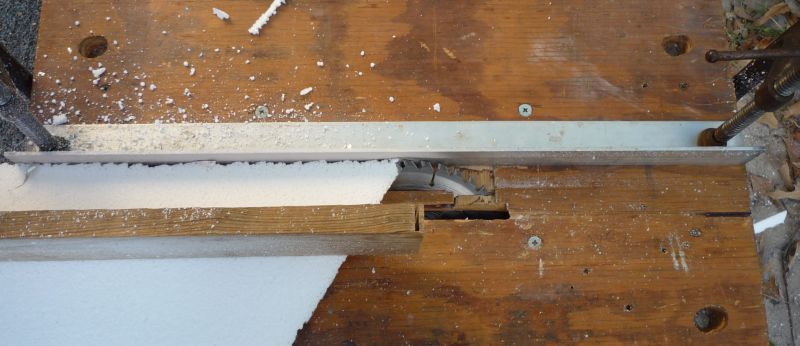
- Cut them with a bread knife and a metal straight-edge (see photos below). This is much easier than setting up a 30° miter jig on your table saw.
- Now set up a table saw with blade angle at 35.5° (from vertical, toward the fence). Set the blade height a tiny bit less than the thickness of the material. Set the fence where it very nearly touches the blade tips. Use a thin-kerf 40 or 60 tooth finish blade. Push them through using a 1×4 board placed close to the blade, to keep the foam sheet down and make a smooth cut. Don’t cut all the way through to the top surface or it’ll make a jagged edge. Finish the last bit of cut with a sharp knife. Mind which side is down! If you want the foil side inside the reflector, put the foil side down on the table saw. Caution: wear a painting mask! You’ll make lots of poly-dust.
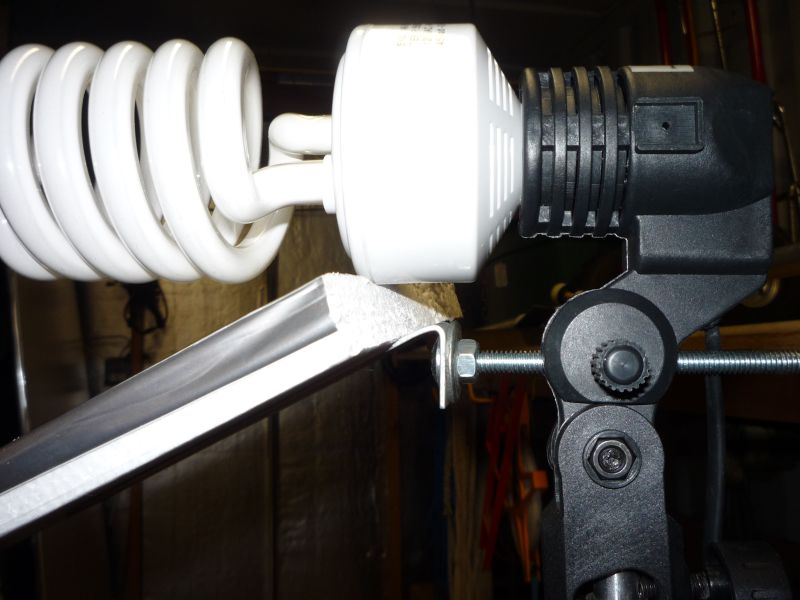
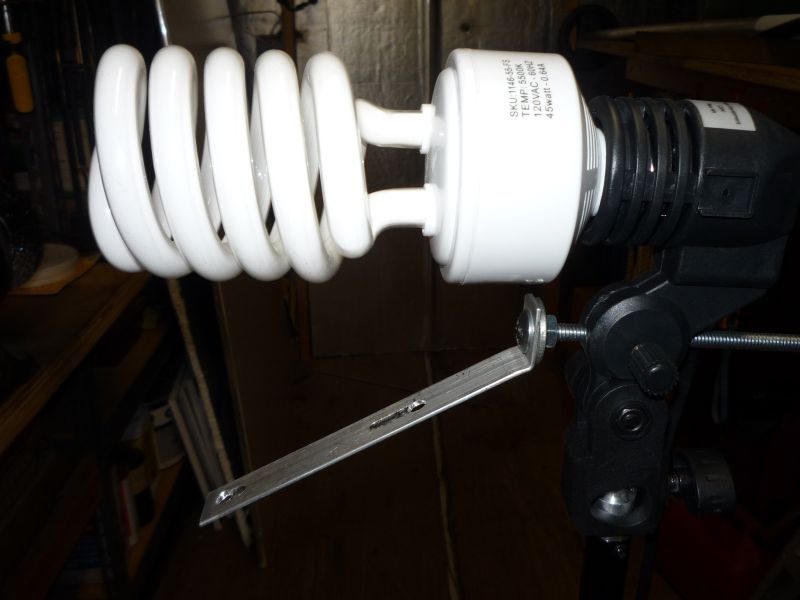
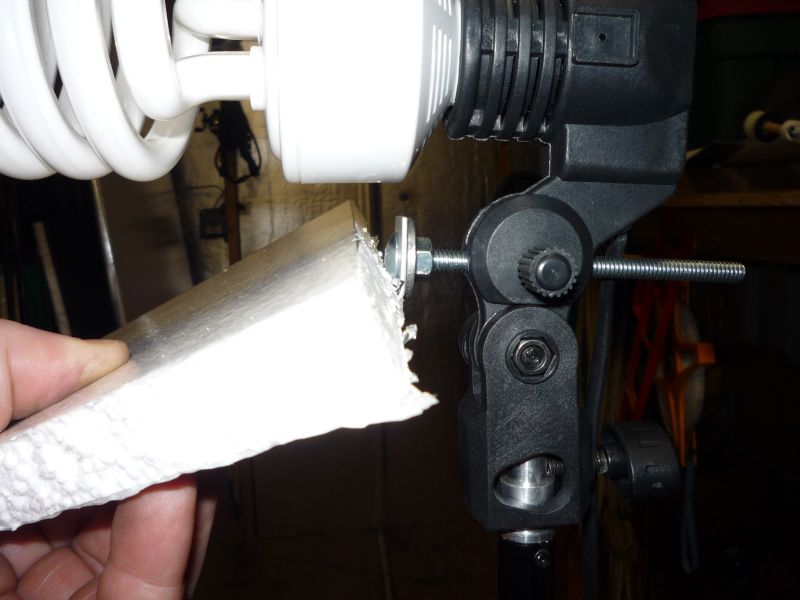
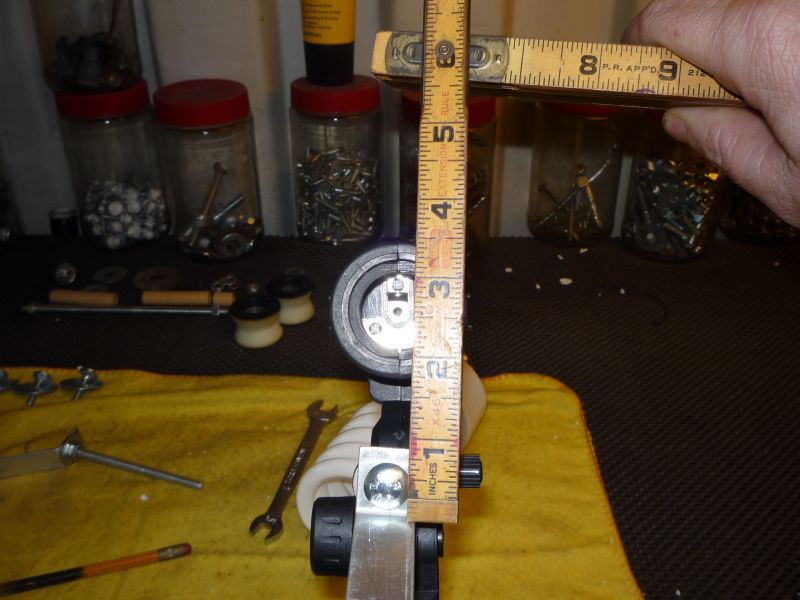
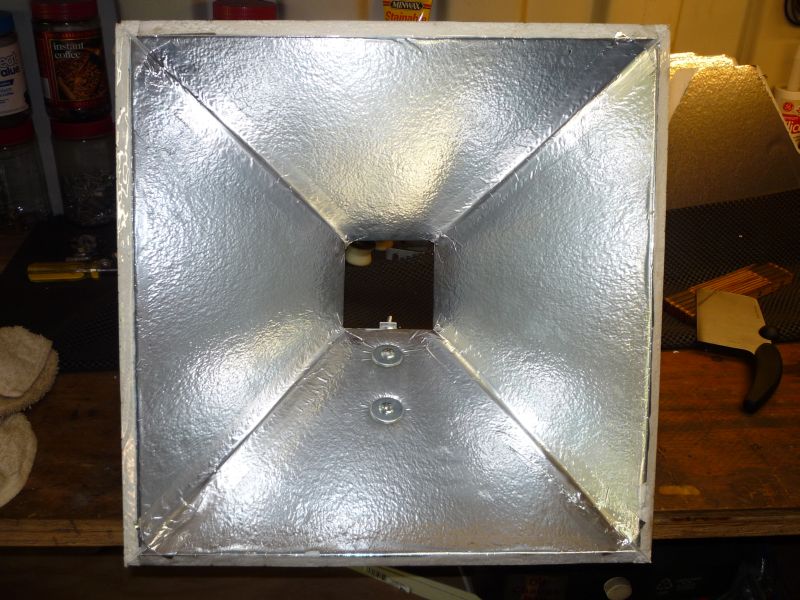
- Make your brackets as shown below in the photos. Insert one into the umbrella holder hole of the photo light socket and measure to the center of the socket; double that and cut that much off the tops of the triangles. My fence was set at 11 inches from the blade. The end result is a hole in the top of the pyramid that’s 5¼ inches outside, and 3¾ inches inside. Plenty of cooling for the CFL ballast.
- Wrap the top and bottom edges with 2-inch clear packing tape to keep them tidy.
- Put packing tape half-way on the two upper sides of two triangles, then stick them all together (see photos). Then, if desired, tape the inside corners with aluminum tape. Rub the tapes down with a cloth.
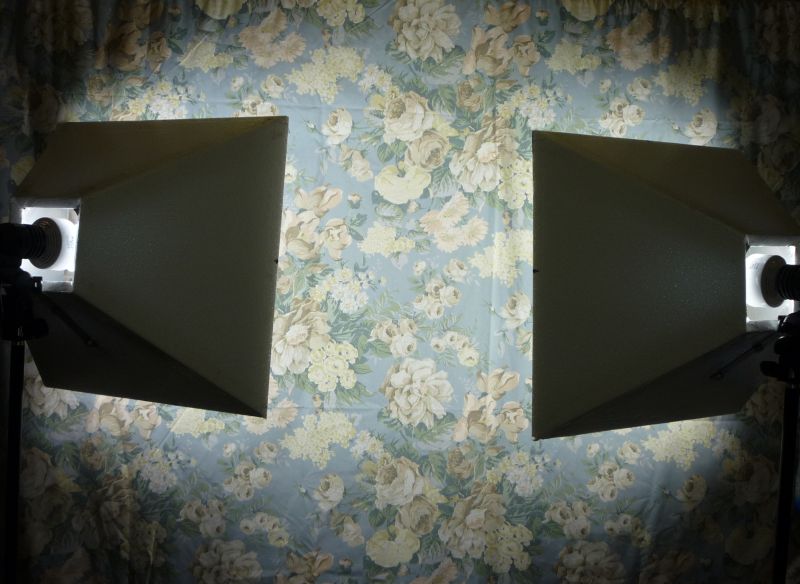
- Mount the brackets on the pyramids, then on the lights.
- Make cloth diffusers. I used some sheer I had; most people use white ripstop nylon. If you make them too large, you can sew a pocket in each edge and use a draw-string in them around the base of the pyramid. Or you can use Velcro. It’s handy to be able to remove them for (1) washing, and (2) when a slightly brighter, harder light is needed.
- DO NOT use hot lights with these reflectors! They will melt and catch fire! CFL’s only. I use Alzo Digital 45-watt, 5500K photo lights.
The Math for Equilateral-sided Pyramids
…is very simple. I searched for that bevel angle for several days, and even contacted a mathematician! Only when writing this article did I notice that the bevel on the ridge joints is the same as the half-apex angle!
The width of the material you will use will equal the slant height (h′). The width of the base (a) equals the corner slant height (aka ridge length) (s), since we’re gonna use equilateral triangles. The rest works like this (let’s say each side of the 4 triangles is 18 inches):
- a (length of square base) = 18
- s (length of base corner to apex; slant height; ridge length) = 18
- h (vertical height from base to apex) = ½sqrt(2)a = .707a = 12.728
- h′ (slant height) = ½sqrt(3)a = .866a = 15.588
- ε (base to side angle) = arccos(sqrt(3)/3) = arccos(0.577350269) = 0.955316618 radians × 180/pi = 54.7356103 degrees.
- 90 − ε (in degrees) = 35.2643897. This also the saw bevel angle!
- 35.2643897 × 2 = 70.5287794 degrees, the apex angle between opposite sides.
The above angles are good for square pyramids with 4 sides made of equilateral triangles, so to make other sizes all you need to change is the base size and calculate the slant height (h′) so you can cut your material to that width. If you wanna change the apex angle from 70.5, then you’ll need isosceles triangles and a bunch of hairy trig… Please don’t ask me—I donno!
Photos
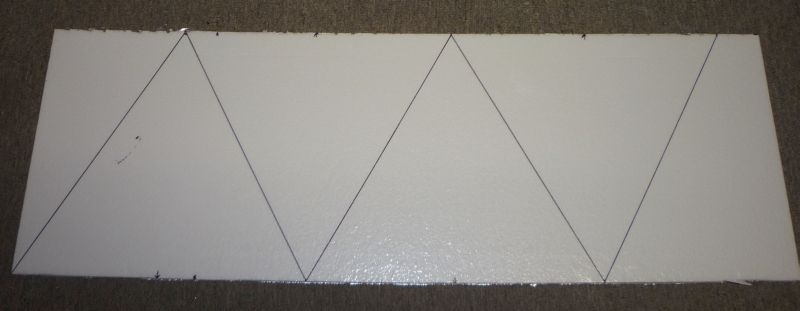
Measure and mark.
Cut with a metal straight-edge and a sharp knife.

Measure and drill the brackets like this.
Then bend them, but not like this.
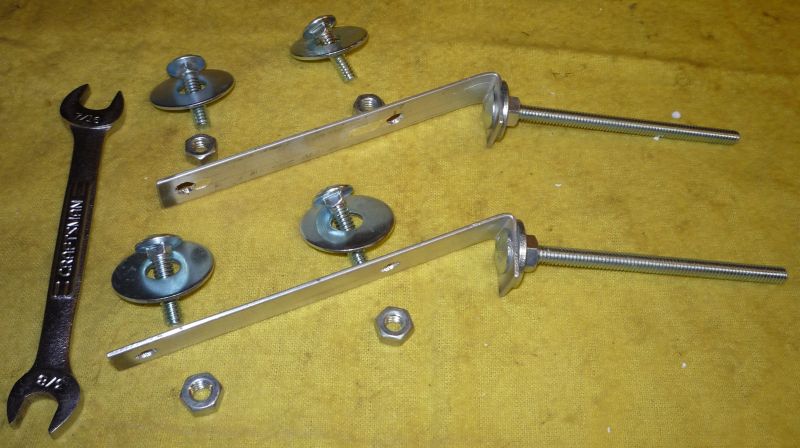
Oops! Not enough clearance! But this would by just right for
foam core or Coroplast, since they’re much thinner.
Okay, bend them the other way and turn them over.
Now there’s plenty of clearance.
Measure from the bend to the center of the socket and then double it, so the light will be centered.
Measure that much across the triangle and mark, then cut on the mark.
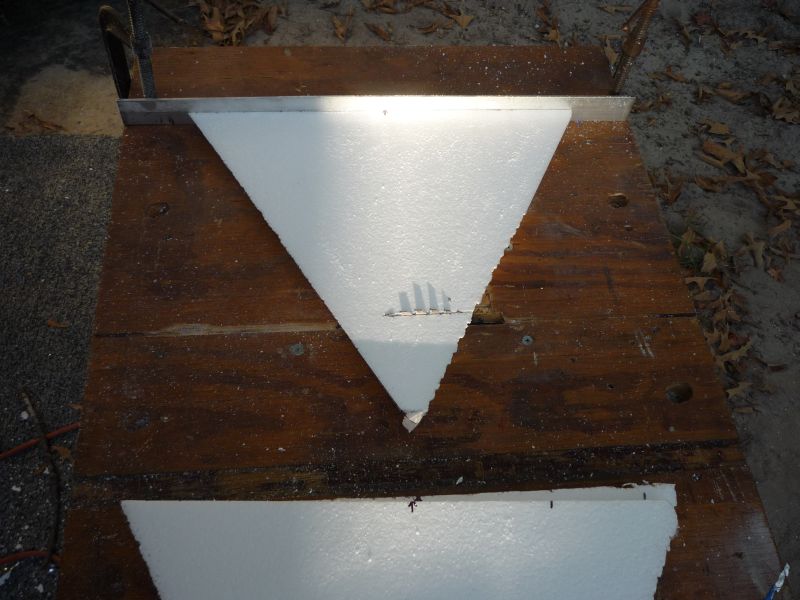
Use the table saw so the tops will be parallel to the bottoms.
Cut the 35° bevels on 2 sides of each one. Note the jagged edge: because the thin plastic
sheet on it tore instead of cutting cleanly. I lowered the blade a bit and cut the rest of them.
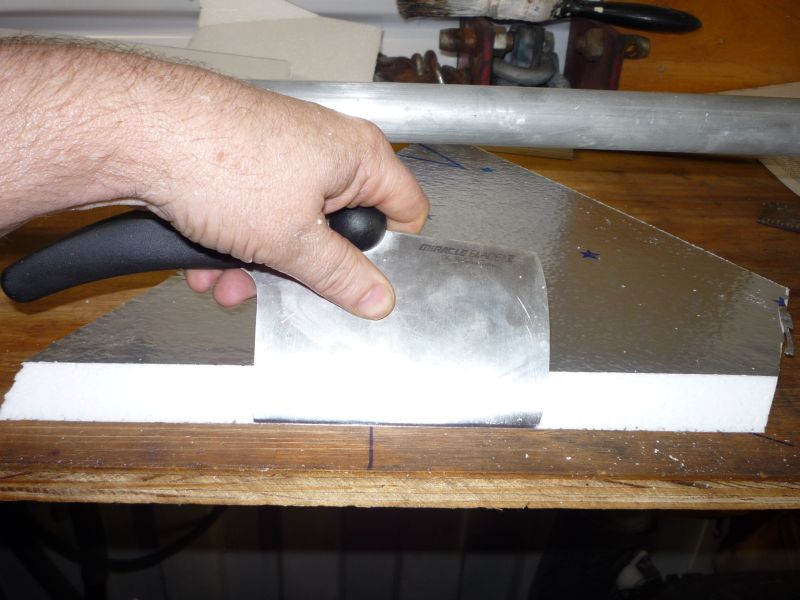
Finish the bevel cuts with the knife, nice-n-tidy.
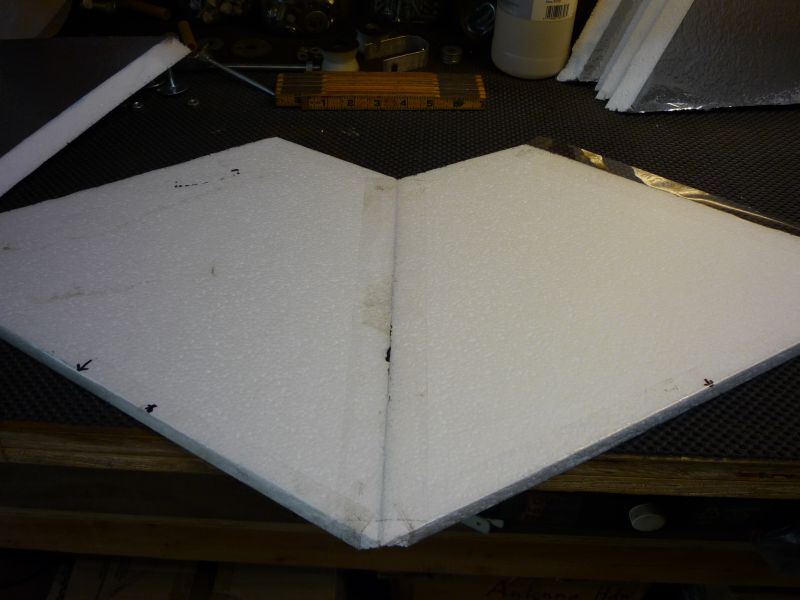
Tape it together outside with packing tape…
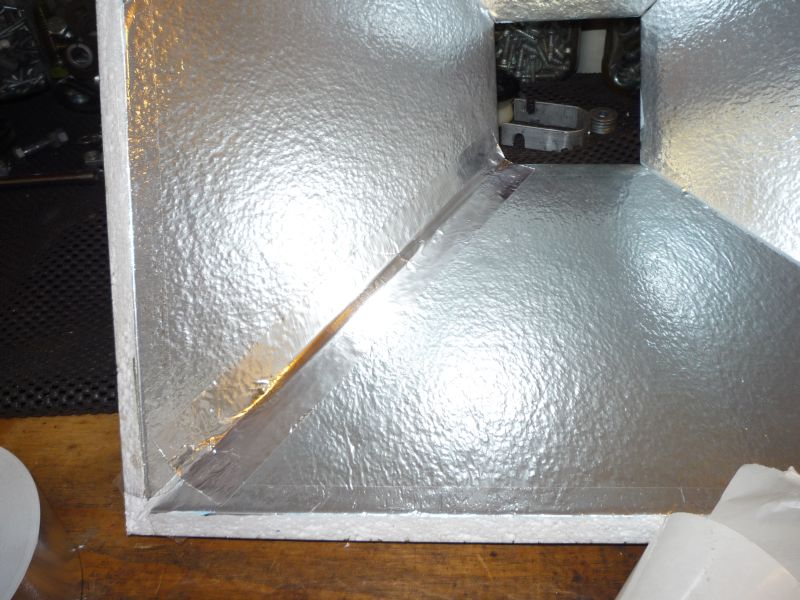
…then inside with aluminum tape.
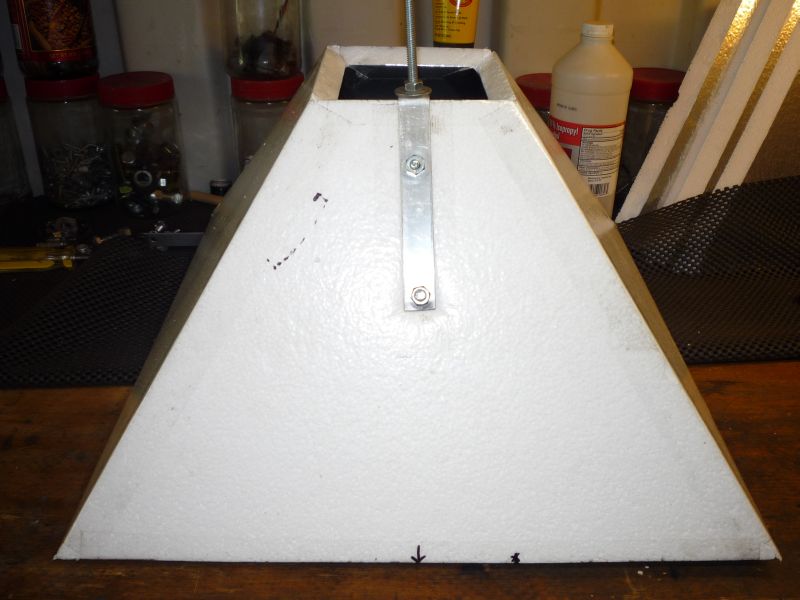
Mount the bracket with ¼×1-inch carriage bolts…
…using big flat-washers inside. Before mounting the brackets,
reinforce the coatings with a couple layers of packing tape.
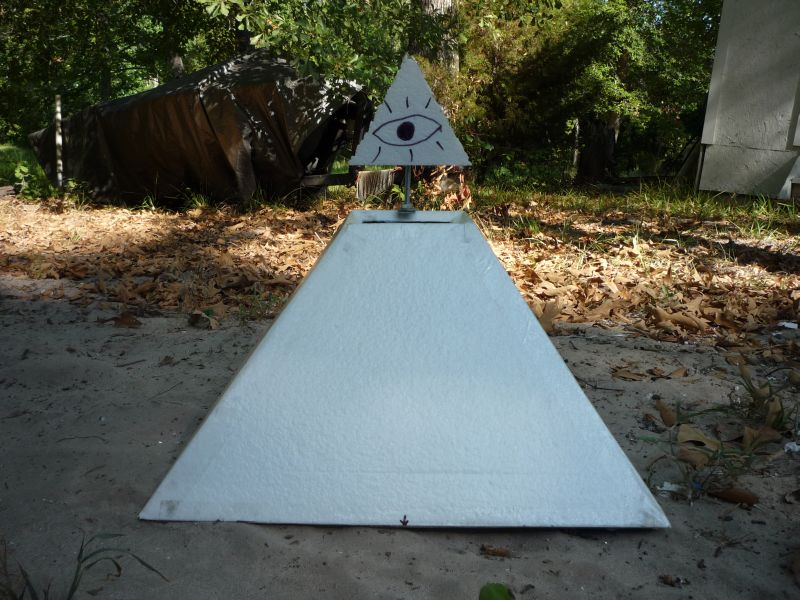
“NOVUS ORDO COGITANDUM”
(Sorry, I just couldn’t resist!)
And there it is.

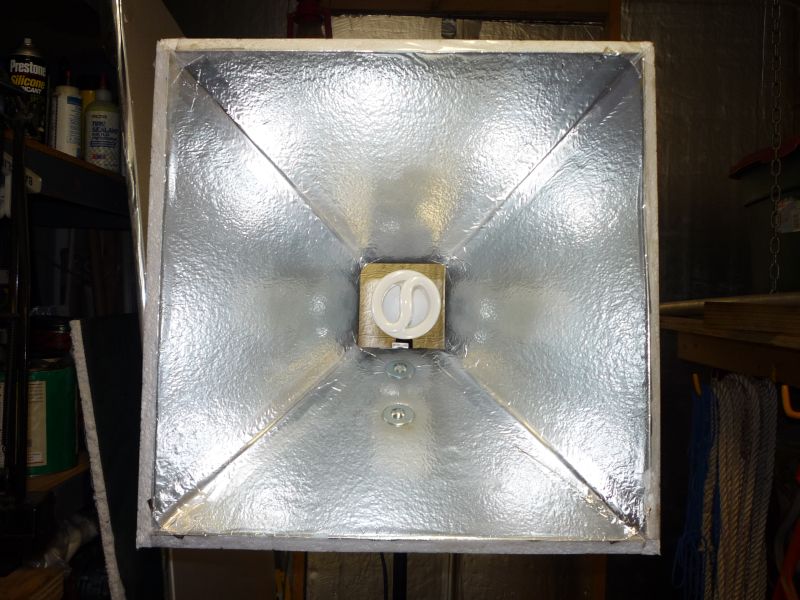
Let There Be Light!
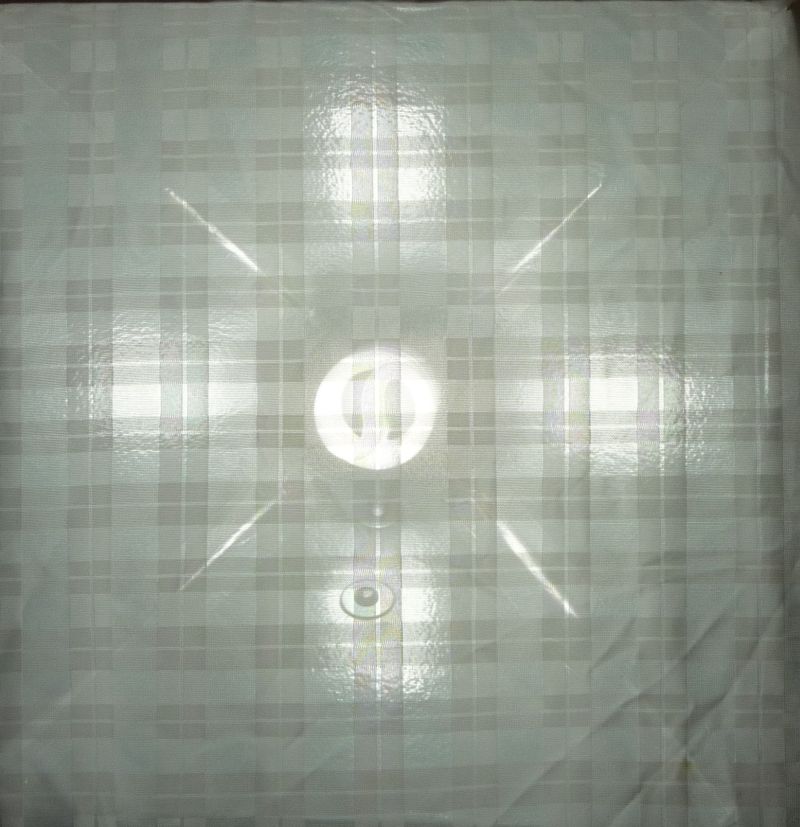
But let it be somewhat diffused.
That’s 5600 Lumens in a 70° angle.
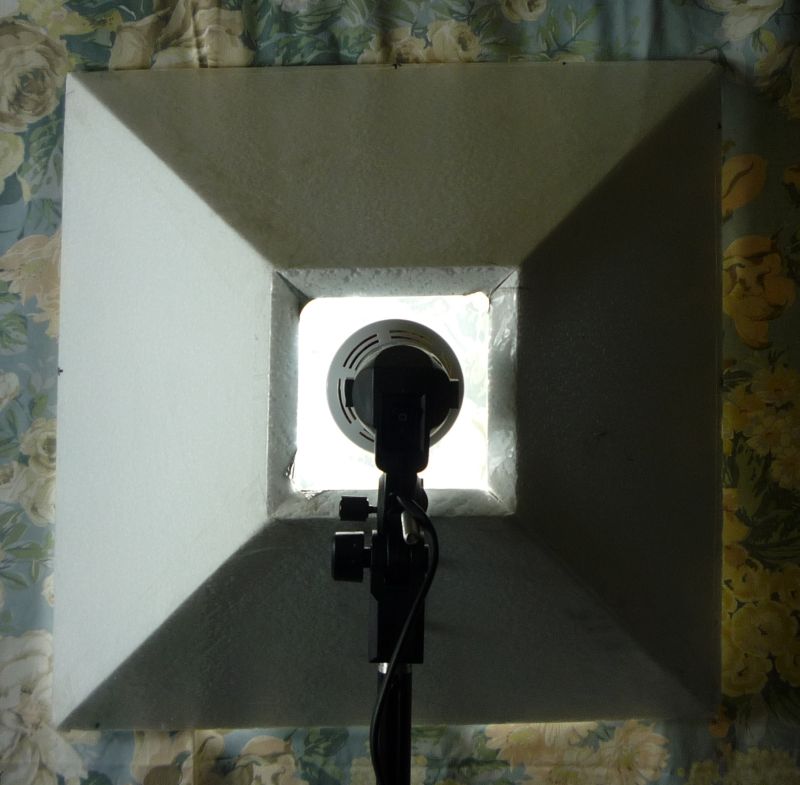
A little leakage, but plenty of cooling for the ballast.
Notes
- See the notes in the first lights article for more info on the bulbs and other stuff.
- You could use the giant ALZO 85-watt bulbs, but a pair of the 45’s in a Y-adapter would be brighter.
- If you use a denser diffuser cloth (or a solid plastic prismatic diffuser), cut a ventilation hole in the top of the reflector. Excess heat will kill the electronic ballast.
- Make sure no one can trip on the cords—doing so would probably destroy the light, and injure someone.
- It’s better to use polyisocyanurate (Rmax Rmatte+ brand); it’s denser, stronger, and much less flammable than polystyrene foam. If you cut it on a table saw, the edges will be smooth enough to glue with contact cement. I couldn’t find any locally, but the big-box stores like Home Depot usually have Rmax.
- If you’re just getting started in photography, visit some of the better photo/video web sites and look for studio lighting tutorials. They will explain how to set up the main lights (key and fill), as well as hair lights and backlights. The same lighting arrangements work with photo strobes as with constant-on video lights.
Stay Tuned!
I’m still thinking about building another Merlin-style stabilizer using ¼″ 6061-T6 aluminum.
—KV5R
Harold, you have been very busy in your retirement… good for you! That’ll keep your mind healthy doing these types of projects. Your email was received concerning Tyler Texas, I understand the reason for not being able to help. I have used softboxes in my production work from time to time. Your Website is quite informative and entertaining to look at all of your projects.
’73 de Jon – N5UUA
Howdy Jon,
Yeah, that was 10 years ago. Haven’t been able to do much of anything for 3-4 years now. But I keep the brain busy…
Not long after I made 2 kinds of soft boxes (and finally bought photo light umbrellas), then they came out with LED panels, which make bulky reflectors obsolete.
73, –kv5r
Hi, great reflector. Im glad I found someone with a idea like mine.
But Im going to try in mirror acrylic laser cutted. It would give much more precision on ligh reflectange i suppose.
Best regrads