
stuff for the microscopy lab
© 2014 by KV5R. Rev. June 1, 2014.
Introduction
This article introduces some of the various accessories and expendable supplies needed in the home microscopy lab. While few if any are needed for toy, USB, and stereo microscopes (which are typically used for viewing solid objects), the biological microscope requires many accessories and supplies — a whole mini-lab — for preparing specimens and slides.
While you can buy a nice advanced student-grade microscope and a 1.3MP imager for under $250, you’ll be surprised and dismayed to discover that all the little accessories and supplies may cost that much again, and more, as you learn more advanced methods of slide and specimen preparation. But like any hobby, there are shortcuts, and you don’t really need certified lab-grade chemicals and stains, or expensive lab tools, glassware, and appliances. Improvising to keep costs down is part of the fun.
Slide preparation may be as simple as placing a drop of pond water on a depression slide, or it may be as complex as thin-slicing wax-embedded tissue samples with a microtome and making permanent histological slides. We’ll cover some basic slide preps in another article.
Microscopy Lab Accessories
Digital Imager and Computer
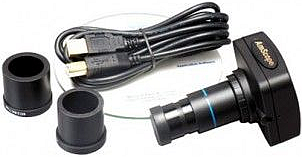
The first and most useful accessory is the USB digital imager, with its adapter, to connect the microscope and the computer, which greatly enhances its usefulness and enjoyment. They are about $100 for a 1.3MP imager (with its reducing adapter), which is 1280x1024 pixels, nicely filling the modern computer screen, and able to run real-time video at about 15FPS over a USB-2 connection. Live viewing on-screen is much more enjoyable than precisely hovering over an eyepiece for hours. It also allows others to watch, learn, and get involved the fascinating micro-show. Best of all, it allows one to easily capture whatever is seen, directly to the computer, as still images or video. It also allows digital tricks like focal stacking, where a series of images are captured at different focal points, then combined with focal stacking software, to create photomicrographs with an impressive depth of field.
Avoid the entry-level USB imager, as it is usually a 0.3MP (640x480 VGA) unit, which is entirely insufficient for modern computer screens. As you move up the scale to 2, 3, 5, 8, and even 10 megapixel imagers, the price rises steeply, with the latter being about $400. Imagers beyond 1.3 megapixels are wasted for real-time computer-screen viewing, due to the 60 MB/sec bandwidth of USB 2.0. The higher resolution imagers are better suited for for still-shots suitable for high-resolution color printing for archival and/or print publication purposes. Note that USB 3.0 (625 MB/sec bandwidth) is becoming more popular on new computers and digital devices, so it is now possible (given sufficient money) to put a high-resolution microscope imager directly into a computer and view real-time (e.g., 30+ FPS) full-HD video. Currently (April 2014) they are ridiculously expensive — wait for reasonable prices on USB-3 imagers. There is no reason for USB-3 imagers to cost any more than USB-2, except that they are currently somewhat rare and in demand.
If you already have a nice DSLR camera, you can buy a brand-specific adapter and use that for saving high-resolution images and video clips, and use a 1.3MP USB imager for routine live on-screen observations.
The Microscopy Workspace

We quickly tire of any hobby if we have to pull everything out, set everything up, and put everything away after each use. A microscopy lab doesn’t need much space, but it does need shallow shelves or compartments for all the little accessories and supplies. A small hobby/craft/sewing desk, about 48 by 20 inches, with plenty of storage and a couple shallow (≈4–6 inches deep) shelves mounted above, will provide ample space to set up a permanent microscopy lab. The top should be glass or chemical-resistant laminate. It should be right next to your computer desk, preferably in an L-shape, so you can easily turn between the microscope and the computer. Alternately, a dedicated laptop might be placed right next to the microscope.
If you have young children around, get a desk with a locking drawer, or a shallow wall-mounted locking cabinet, for your stains, chemicals, and sharp tools. Things like methanol, xylene, acetone, stains, and razor blades are common in microscopy labs. Take no chances with curious children around!
Lighting — get a bright desktop spotlight to light your prep area without casting too much light on the microscope, which will cause flares in your image. I use a couple of little desktop halogen video lights, which are available on-line for about $15 each. They also double as microscope top-lights for viewing solid objects.
Headband Magnifier — the 2x headband magnifier goes for around $35 and is just way too useful to be without. There are also clip-on magnifiers
for glasses. Any time you are working with little parts, little samples, and little drops, the magnifier (any hands-free type) will make your task much easier and more fun. I wouldn’t clean a slide, drop a drop, or place a coverslip without it. Also handy for splinters, electronics, soldering, etc.
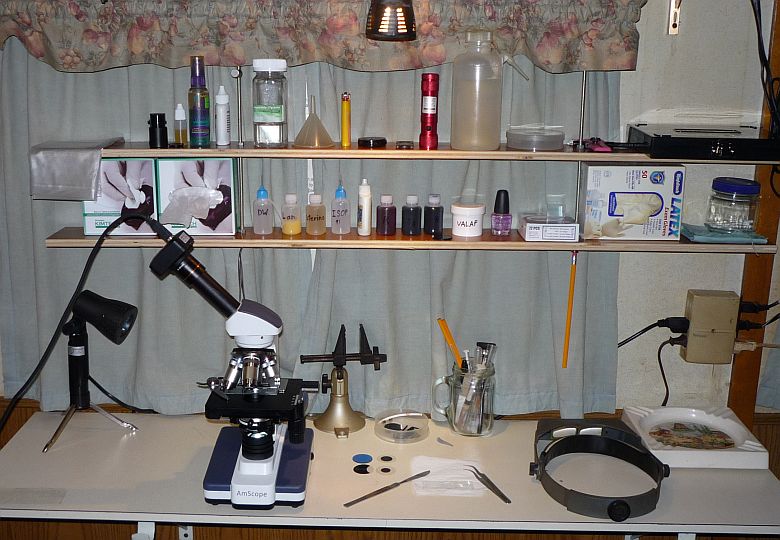
My tiny microscopy lab is just 48×14″ laminate-covered plywood mounted on shelf
brackets and two 4″ shelves. Not shown: Large shelf above; computer is left.
Basic Stuff
- Slides — Slides usually come in boxes of 72 for $5–$7. Get the ones that have a frosted end for marking.
- Coverslips — they come in tiny boxes of 100 (you’ll break a few). Get the #1 thickness (0.15–0.17mm), 22×22mm.
- Depression (well) slides — rather expensive at about $7 for 6, but go ahead and get 6 or 12 if you plan to observe live pond critters. You can spend hours looking at the life in one drop in the depression, unlike with flat slides where the water dries up in 30 minutes or so, mashing and killing your critters before you’ve fully observed the drop. The depression slide allows your critters to freely swim around long enough to to view the whole depression.
- Slide Box — holds your permanent slides. The Heathrow 100-place slide box is cork-lined plastic, and under $7 on Amazon (click the image to see). Histology (permanent mount) slides should always be stored flat, so keep your slide box stored on-end, in a bookshelf.
- Prepared slides
— not essential, but a box of 25–50 professionally prepared slides will get you started and show you what histological slides should look like. The better ones are rather expensive ($2–$4 each), but remember they are all hand-made.
- Various little 4-ounce wide-mouth glass food jars — for collecting and storing samples. Eat the contents, save them from the landfill, soak and remove the labels, wash, bleach, rinse, and dry. The best ones are short, wide-mouth jars like horseradish and garlic sauces use. Be on the watch for other useful food containers. For example, the big plastic lids from peanut butter jars make good petri dishes.
- Various clear plastic food containers, with snap-on lids — wash and retain a few to store your delicate optical stuff, like extra lenses, filters, and lens cleaning kit, that you don’t want to become contaminated with dust.
- A 10-inch glass pie dish — put some paper in the bottom; makes a great place to handle wet samples, stains, and chemicals without messing up your desk. I recently discarded a dead microwave oven, but retained the 12-inch glass turntable platter as a nice prep surface for my lab desk.
- Tweezers
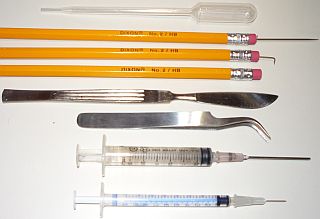
A few basic tools— fine-point curved stainless ones, mainly for handling coverslips. $40 for lab tweezers, $6 for same ones marketed as bead hobby tweezers. Shop carefully! You’ll soon find that fine-point curved tweezers have many other uses than just grabbing small items. For example, I frequently use mine to square up a coverslip; just lay both points on the slide and push against the edges of the slip. They can also pick up and drop tiny amounts of water, by capillary action between the points.
- Dissecting Needle — not just for dissecting, sometimes you need to move a tiny object on the slide, or gently lift a coverslip, etc. You can make one by pushing the back-end of a sewing needle into a pencil eraser (use pliers). Or, you may want to simply purchase a dissecting kit,
- Plastic Pipets
- Syringes with blunt needles
- 30mL Needle-cap bottles
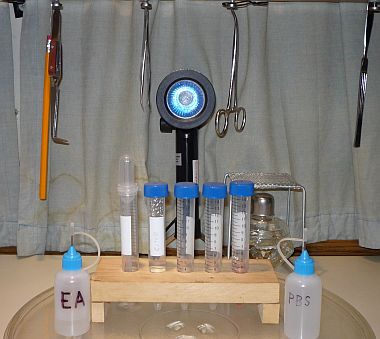
Needle-cap bottles and centrifuge tubes.
Behind: 50w video light and alcohol burner.
Above: tools hang from neodymium magnets.— you’ll be making endless mixtures and dilutions of various things, and will also need small quantities of several common things like distilled water and alcohol right at the microscope, so go ahead and get a bag of 25 or so needle-cap bottles. These, as the name suggests, have a cap with a blunt needle, commonly used for oiling sewing machines and such. They are much better than regular “eye-dropper” bottles, because you can put the drop exactly where you need it with the needle. Shop carefully, as many sources want around $1 each. I found 25 of the 30mL needle-cap bottles for about $10 delivered from a Chinese source on Ebay.
- 15mL Centrifuge Tubes
— even if you don’t have a centrifuge, the tubes are very handy for collecting samples in the field, being capped on top and pointed on the bottom. Drill a row of holes in a little block of wood to make a stand. Settle the larger and heavier contents into the point, then extract exactly the stratum you want with a pipette (just above the algae is good), for dropping onto a depression slide and viewing. A dozen of the 15mL centrifuge tubes are only a few dollars, and are more useful than test tubes.
- Kimwipes
— you can use paper towels and toilet paper, but you’ll soon despair of endless lint on your slides. Go ahead and order a couple boxes of Kimwipes for about $4 each. They are almost lint-free, and are also free of particulate matter that might damage delicate optical surfaces. They are also used, folded to a point, to remove excess water from the edge of a floating coverslip.
- Latex exam gloves
— use for handling both chemical and biological hazards.
- Lens Cleaning Kit
— a $15 kit made for cameras will contain lens fluid, lens papers, air puffer bulb, lens brushes and pen, and a couple microfiber cloths. Store them in a plastic bag or jar to keep off the dust that will otherwise ruin your microscope lenses.
- Linear Polarizers
— a pair of inexpensive linear polarizers will allow you to do basic polarized microscopy. Some people are even selling exotic artwork made with polarized photomicrography.
- Think of other little tools and containers that you may already have around the house and workshop.


Glassware and Lab Appliances
Though not essential, a small collection of imported borosilicate glassware may be nice, and won’t break the bank. Note that there is also plastic lab-ware—it’s very cheap but you can’t heat it. The best places to find low-cost lab-ware are sciplus.com and hometrainingtools.com.
- Hemacytometer (counting chamber) — used for counting cells or spores in a certain volume. I’ll devote an entire article to it. Cheap imports are under $20, while pro hemacytometers are ≈$150 and up. The $20 units are fine for non-professional use.
- Beakers
- Small glass funnel
— get one that will fit into your 30mL bottles.
- Graduated Cylinders
— for making precise mixtures and dilutions. I just use various syringes for that purpose, or put a small bottle on the gram scale and measure by weight.
- Coplin jars
— typically used for fixing, clearing, and staining multiple histological sections for permanent mounting. If you need them, look for the plastic coplin jars, as the glass ones are ridiculously expensive, like $20–$50 each, and you’re gonna need about 8 of them for some protocols.
- Watch glasses
— these are like very shallow bowls, and are typically used for evaporating liquids from tissue samples and such.
- Alcohol burner (aka spirit lamp) — used for warming slides to heat-fix cells, and melting wax, valap, glycerin-gel, etcetera, these little spirit lamps are quite handy. They’ll burn 91% isopropyl and 95% ethyl alcohols. Get one with a stand, it’s handy. Inexpensive spirit lamps are ≈$6 at sciplus.com.
- Sieves — these are used for classifying samples by size. For example, a 270-mesh (53μm) sieve would only pass smaller objects like single cells and bacteria, while removing larger objects like algae clumps and multicellular critters. The smaller objects can then be observed without interference from larger (usually more opaque) objects, and the larger animals may be observed without gobs of bacteria by back-washing the screen. May also be used to separate sands from organic matter in soils. Lab-grade micro-sieves tend to be too expensive for hobby use ($45–$85 each is common), but there are suitable low-cost alternatives, such as 4, 6, and 12-inch-square stainless screens in 25, 50, 75, 100, 120, 150, and 200μm, for a few dollars each. Search eBay for micron-screen. One might cut these into circles, fold into cones, and place in a little funnel for sieving pond life.
- Digital gram scale
— these mail and kitchen scales are about $20–$40 on Amazon and are useful for making larger quantities of mixtures and dilutions. They typically have a 1 gram resolution and a 2500–7000 gram limit. Many lab chemicals are available in dry powder form, with instructions for making liquid dilutions, and such are almost always by weight, not volume. They are also very useful in the kitchen for precision baking, and in the office for weighing parcels and mail.
- Digital milligram scale
— these little gemstone scales are available for around $20, and are useful for making small quantities (1–15mL) of dilutions and mixtures by weight, which is much more accurate than volumetric measurements. They typically have 1 milligram resolution and a 20 gram limit, and come in a little storage box with a tiny bowl, fine tweezers, and a couple of 10g calibration weights.
- Digital pH meter
- Digital timer
— many lab protocols specify exact times for staining and such. Any digital kitchen timer will do, as long as it has seconds.
- Centrifuge
- Microtome — if you wish to section plant and animal tissues micro-thin for transmitted light viewing and histology mounts, you need a microtome. These range from hand-held devices with a straight-razor (≈$35–$100) to to big lab machines that cost $10,000+ — though used rotary microtomes and new Cambridge rocking microtomes may be found for around $300 (still too expensive for me). I have read that the simple hand-held devices are rather unsatisfactory for any serious histological work, but I just ordered an Omano OMA-100 hand-held microtome from microscope.com for $35, and will write a review after some experience with it. If you do get a hand-held microtome, make sure it has the clamp inside, which allows you to simply clamp tissue samples in a split carrot instead of the tedious process of wax embedding. The amateur microscopist without a microtome usually just slices very thin wedges of plant or animal tissue (the softer ones being first frozen) with a razor blade (or safer, a scalpel), then views the cells along the thin edge of the slice. But the wedge shape is not suitable for coverslipping or permanent mounting, so once studied, such wedge samples are usually discarded.
- Hotplate Stirrer


Chemicals and Solvents
You’ll need a small collection of most of these for a variety of purposes. Small quantities of lab-grade supplies are way too expensive, so look for alternatives.
- Immersion Oil — if you plan to use the 100x objective, you’ll need a little bottle of Cargille Type A. It has the same refractive index as glass, and thus optically couples the condenser to the slide, and the coverslip to the objective lens, without refraction. It’s not optional—if the lens is designed for oil immersion, it will look terrible in air. Optionally, you could use glycerin, which is pretty close, but it’s not recommended, because glycerin (1) will leave a gummy residue on the lens, and (2) might ruin the objective by dissolving or degrading the glue that holds and seals the lowest lens element. Before trying oil-immersion, look on youtube for any of several video tutorials, which may keep you from ruining your most expensive objective. After use, the OI objective lens and condenser are cleaned with a drop of xylene on a lens tissue, by gentle blotting, not rubbing. We’ll cover oil-immersion in more detail in a later article.
- Distilled Water — get a gallon at the supermarket and keep a 30mL needle-cap bottle of it handy. Beware, though, of adding distilled water to live wet-mounts, as it’s hypotonic and may lyse (rupture) your critters and cells due to osmotic pressure. It’s best to replenish a drying slide with water from the sample. Distilled water is usually used as a diluent for water-based stains and such.
- Phosphate Buffered Saline
- Phosphate Buffered Saline EDTA
- PBS-EDTA is essestial for diluting blood samples for cell counting, hematocrit, and other whole blood tests. EDTA is an anti-coagulant (like Heparin), and if you don't use it, your sample will coagulate in a few minutes, rendering it unusable. Professionals draw blood with Vacutainers that are lined with EDTA, but the home/student hematologist will do it the old-fashioned way, drawing blood with lancet or syringe then diluting (exactly 10x or 100x) with PBS-EDTA.
- Alcohols — very flammable, so keep only a 30mL needle-cap bottle of each at the microscopy station.
- Isopropyl 91%, at the drugstore. Used for cleaning and sterilizing slides and other hardware and containers. Make sure it isn’t denatured ethanol, which contains a variety of denaturing agents like gasoline, MEK, mineral spirits, etc.
- Ethanol 95%, at the liquor store (Everclear). Used for diluting ethanol-based stains, and various other purposes.
- Methanol
(aka wood alcohol, model racing fuel, etc) 99.5%, on-line, Duda Diesel LLC has 950mL for ≈$12 on Amazon. Lab-grade stuff is like $50 a bottle. Used as a fixative for cells so they can be stained and rinsed without washing the cells away. Also used at progressive concentrations for dehydrating specimen prior to mounting in resin. Methanol is toxic and flammable, and must be used with care (gloves and ventilation). Consuming it causes permanent blindness or death.
- Xylene
- Acetone
- Acrylic Nail Polish
- Canada Balsam — from the fir tree Abies balsamea, is the classic organic permanent mountant used in histology, because it has a refractive index very near glass (1.515), and it stays stable and clear for 100+ years. Hometrainingtools.com has 0.5 ounce (15mL) for $11.50; they just call it UN-CEMENT, but if you look at the MSDS it’s Aldon Corp. Canada Balsam, neutral in xylene. HMS-Beagle.com has 15mL for $9. Cynmar gets $22.40 for 30mL; naturalpigments.com gets $30 for 4oz (118mL) (as an art oil paint plasticizer, might not be suitable). Specimen are typically fixed with formalin, dehydrated with alcohol, optionally stained, cleared with xylene, then mounted in Canada balsam, which is soluble in xylene.
- Euparal — once-popular mountant that’s been around since 1904, intended for wholemounts and parts of small insects and larvae taken directly from 95% alcohol. Hard to find, but Bioquip.com has 20mL for $17. They also have its solvent, called euparal essence.
- PVOH — Polyvinyl Alcohol (not PVA, Polyvinyl Acetate) is relatively inexpensive (if you shop carefully) and is said by some amateur microscopists to be their favorite permanent mounting medium, because it’s water-soluble and does not require specimens to be dehydrated in alcohol or xylene. Comes in powder or liquid, a little hard to find; ≈$8 per 1/2 pound of powder from soapgoods.com. 30g powder @ $4.75 from hometrainingtools.com. 500mL 4% aqueous @ $8.75 from flinnsci.com. Price varies widely, so shop carefully.
- Acetic Acid
- Methylcellulose — use a 1.5–3.0% aqueous solution as a nontoxic thickener for slowing or stilling lively protozoa for microscopic viewing and photomicrography. Ridiculously expensive from the major lab suppliers, but hometrainingtools.com has 30mL for $3.25. I haven’t tried it yet, but I have a pound of konjac powder (a food sauce thickener) that might work just as well, as a small amount will gel water in a short time.
- Glycerine
- Paraffin wax
— for embedding tissue samples (after progressive dehydration in methylene and xylene) for sectioning with a microtome. Also used for sealing wet mounts and making valap sealant.
- Valap — DIY wet-mount sealant made from equal parts VAseline, LAnolin, and Paraffin. Heat them and mix well, but slowly to not add bubbles. Pour and store in a 2 ounce (or 60mL) apothecary jar (saved from cosmetics like skin cream). Apply to the coverslip’s edges with a bent wire (paperclip) heated in the flame of a spirit lamp (or cigarette lighter).
- GALA 20 and 60 — safe DIY fixative. See this link for details on making GALA and other useful stuff.
- Fructose — aka Karo light corn syrup,
- … and various other stuff you may need for particular protocols.

Tissue, Cell and Bacteria Stains
If you will be exploring and identifying cells and bacteria, you will need several stains. There are dozens of them, and the certified lab-grade ones are way too expensive, typically $10–50 for tiny bottles. The most common ones (that I know a little about) include:
- Gram Stain Kit
- Methylene Blue — most common microscope stain, typically used at 1%, 0.2%, and 0.025%. Usually sold as 1% stock solution, ≈$10 for 30mL. But Wait! You can buy 4 ounces of 2.4% for ≈$3! Dilute as needed. It’s called Kordon Methylene Blue,
an anti-fungal medicine for aquarium fish.
- Malachite Green — used as a counterstain to safranin, and as a primary stain for spores. Available as a fish medication for ich. Kordon Malachite Green
4oz.
- Lugol’s Iodine
— Greatly diluted, it’s used to stain starches. Also good to put a drop (1 only!) in your drinking water every day, as most people are iodine-deficient.
- Eosin Y — this is the common red-yellow counter-stain used with a blue/violet stain in the Wright’s method, which is frequently used to stain nucleated cells. The nuclei stain blue and the cytoplasm stains pink-red. Uses include white blood cell differential counts, etc.
- Hematoxylin — used with Eosin in the H&E histology staining method. Stains nuclei blue. Being extracted from the heartwood of a somewhat rare hardwood tree, it’s rather expensive at ≈$50 for a little bitty bottle. I’m thinking that cheaper blue stains, like methylene blue, may be substituted for nuclear staining, if its pH is basic (≈10).
- Gentian Violet
(aka Crystal Violet) — used in gram staining and elsewhere. Humco or DeLaCruz brands, 1–2 ounces, ≈$4.
- DIY — I made some experimental stains with ink-jet printer refill inks
. They’re water-based, non-toxic, and they work! The trick is to get the dilution and pH right, and that takes some time. You need a blue with pH about 9–10 and an orange or red with pH about 5–4. Dilute to 1–6%. The nice thing is that you can look up a CMYK to RGB conversion chart and literally make any color you want, dilute to any strength, and adjust to any pH, and a kit of 4-ounce bottles cost under $20, and diluted will make like 5–10 gallons. Such stains should work to differentiate acidic and basic structures, but are probably not suitable for more complex staining methods employing specific biochemical reactions.
For more info on stains and staining, see Wikipedia, Staining.
Lab Safety Reminder
It’s your lab, so feel free to experiment, but please be careful. It’s a good idea to read a book on bio- and chem-lab safety procedures. Many free ones are on-line, from the NIH, CDC, various universities, and other free education projects.
In the next article, we’ll take a look at sensible, basic lab safety. Please don’t skip it!
—KV5R
Thanks for posting this list. As a rank beginner, it’s been difficult to find a list of supplies – this is the only one I’ve found thus far.
Things are very open and intensely clear explanation of issues. was truly information. Your website is very beneficial.
Amazing article thanks or sharing..
So, that i spretty intersting for me to read about the things that I am interested in.
Nice info. I used an optical microscope daily for many years. I worked in materials science discipline. I ran an SEM too. Nice to be able to go 250K x mag. I still use an optical one as a hobby on occasion.
I REALLY LIKE YOUR MICROBIOLOGY LAB. I’VE ALWAYS DREAMED OF MY OWN. IS THERE ANY LEGAL REGULATIONS ON HOW EXTENSIVE A PERSONAL LAB CAN BE? DOES EACH INDIVIDUAL NEED TO GO THROUGH A LOT OF LEGAL PROCEDURES TO OWN ONE MICROBIOLOGY LAB? WHAT ARE THE REGULATIONS?
I’M HOPING TO GET ONE LATER IN THE FUTURE SO I CAN DO INDEPENDENT RESEARCH!
I’m unaware of any regulations on having a home hobby/educational lab, no matter how extensive and complex it may be. You might have local regs on storing flammables (like acetone and xylene) in a residence; also disposal of “sharps” in an approved sharps container. Please see the Home Lab Safety page.
Lots of regs and certifications are required to run a professional lab — one with customers and employees — but that’s a whole different matter.