camera accessories—stop spending and start building!
© 2011 by KV5R — Rev. June 20, 2011 – May 27, 2012.
The words Steadicam and Merlin are registered trademarks of Tiffen,
but are often used generically to refer to these types of camera stabilizers.
In This Section
DIY Camera Stabilizers

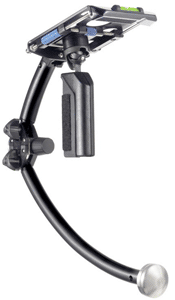
The Tiffen Merlin
I was watching some videos that people make with pocket cameras and cell phones—so much shake you can’t tell what you’re looking at! I’d heard of video camera stabilizers like the professionals use, so I looked up “Steadicam” to see if anything was available for pocket cameras. Yes, and the nice ones run $400–$800… Somebody must be building homemade camera stabilizers for non-professionals. I then discovered and watched the many videos on YouTube about homemade camera stabilizers. There are three main types:
- the “Merlin” type, which has a U-joint, bearing, and a curved balance leg,
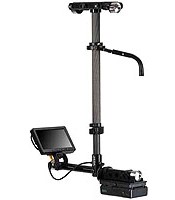
- the “sled” type, which uses a vertical shaft with a gimbal assembly around it, and
- the “dumbbell” type, which is just water pipe with dumbbell weights on the bottom.

The Tiffen Pilot sled
I decided to build one for my Lumix LZ8 pocket camera. It’s a small, ≈$160 camera with some nice features, and it also does video. It weighs 205 grams (0.45 pound), so it will need a very small and light stabilizer. But which one to build? Most of the DIY camera stabilizers on YouTube fall into two categories (IMO): (1) way too complex (too much precision machining and/or expensive parts), and (2) way too simple (poor performance). The dumbbell type isn’t really an isolated stabilizer—it just adds so much mass and moment that it smooths out your arm movements. No thanks, I don’t wanna carry around 10 pounds of steel just to stabilize my ½-pound camera. I like the vertical sled style, because it’s symmetrical and looks easy to design and build—except for that gimbal assembly. The Merlin type may be built from aluminum stock, a toy universal joint, and a small bearing—that’s the one for me! Well, for starters, anyway…
I called my first Merlin-type Pocket Camera Stabilizer #1. It worked well, but was just too big. So I cut it down quite a bit, and re-balanced it. I called this one Stabilizer #2. It also works well, but is so light the wind blows it around. I finally got it so small (10 inches high, 6 inches deep) that I reached the limit of hand and arm clearance. It works very well, and is very easy to run, if there no breeze.
Then I decided to get serious and build a small sled-type. That was a whole ’nuther experience… More than a week of trial and error, and it finally works. I call this one Stabilizer #3. It started out 24 inches high, then I later cut it down to 18 inches and added more weight, and it worked much better. As I expected, the gimbal was by far the hardest part to get right—the three axes need to cross exactly in the center or it will lean, and making something with sufficient precision in the home shop requires very careful measurements (a dial or digital caliper, not a measuring tape!) and careful work. I also made a simple body mount that goes around your neck and rests on your chest that supports the rig and your arms. Running the sled-type requires a lot more practice and concentration than the Merlin-type.
Meanwhile, I obtained an Aiptek H5 Extreme camcorder. It’s a nice entry-level camcorder, but has some design flaws and feature omissions that limit its usefulness. Still, it’s a lot more camera than a Flip, at about the same price ($130). See my review of it in the menu.
Also obtained a cross-slide vise for the drill press, just to cut slots. But it’s turning out to be handy for all sorts of non-precision milling and drilling tasks. It is very poor quality and requires a lot of finishing to make it work effectively. See my review of it in the menu, Milling on a Drill Press.
If you are interested in this hobby, I hope my experiences and photos will save you a lot of time and trouble. I am writing these web articles because there are lots of YouTube videos but too few web pages with measurements and details for building camera stabilizers. And even if you don’t wanna build one, you can at least laugh at all my mistakes!
Also in this Section
Audio
I developed a batch file that uses several commend-line a/v utilities for the purpose of post-processing the audio track(s) of videos.
Hardware Reviews
I review the Aiptek H5 Extreme, an entry-level HD camcorder.
I review some inexpensive filters and a wide-angle lens.
Video Camcorder Accessories
How to put filter threads on an unthreaded camera.
How to make reflectors and soft-boxes for your CFL video lights.
How to make mounting brackets and lights for your web-cam.
—KV5R

you are very inventive and creative; you always come up with some awesome items that people can use.