
© 2003-2011 by Harold Melton, KV5R. All Rights Reserved. Rev.06/11/05
Icom 706MkIIG Computer Control and Soundcard Interface
Interfacing the radio to your PC has too many “way-cool” advantages. Computer-enhanced radio control and programming, automated logging, and a multitude of digital soundcard modes. See my Getting Started in PC Soundcard Digital Modes page.
The 706 has the usual 1/8th″ CI-V remote control jack. To connect to a computer, you must purchase the Icon interface for $140, and a soundcard interface for $100 - OR NOT! This circuit will cost perhaps $25 (with case and cables and plugs) and does all these neat things:
- CI-V to RS-232 data interface for radio computer control
- RTS to PTT switching
- DTR to CW Key switching
- Audio to/from computer soundcard (not shown in schematic)
Notes:
- No one but you are responsible for mistakes/damage! This circuit, if improperly built or connected, could damage your radio and/or your computer! Work carefully! Double-check everything! All I can say is, mine works fine — no guarantee yours will.
- Chop a 6-foot serial (RS-232) cable in half and use it for connections. Ring out and document the appropriate RS-232 pins to wire colors. Attach wires to PCB. This saves having to solder the RS-232 plug.
- See page 6 of instruction manual. Use the 13-pin DIN plug that comes with the radio.
- Get a Radio Shack 6-foot patch cord with stereo 1/8th″ mini-jack on both ends. Cut in half and use for audio lines from PCB to computer soundcard. This saves having to solder the 1/8th″ plugs. Tie both channels together or leave ring floating.
- Get a 2x3x5 plastic box. Dremel-grind mouse holes along top edge, three per end, for cables. Put cable ties on cables. Pinch them into mouse holes with lid. This is much easier than running cables through drilled holes (they will always be twisted, Murphy, 100% of the time, before you get done).
- Make a cable with a 1/8th″ mono jack for the CI-V connection.
- Make a cable with a ¼th″ mono jack for the CW-KEY connection.
- Dress all shielded cables at PCB connections with heat-shrink (avoid a lot of shorts)
- Dress both cable bundles with black plastic spiral-wrap (R/S has it).
- If you run QRO and/or a lot of RF in the shack, you’ll probably need isolation transformers, and perhaps ferrite chokes, in the audio lines. Try chokes first.
You’ll end up with something line this:
| Computer side cables: |
A black box (with PCB inside) in the middle of a 6-foot assembly |
Radio side cables: |
| 5 conductors to RS-232 9-pin plug: Pin 2 - DRX Pin 3 - DTX Pin 5 - Gnd Pin 7 - RTS Pin 4 - DTR |
5 conductors to 13-pin ACC plug: Ground to pin 2 (red) PTT to pin 3 (orange) 13.8 to pin 8 (gray) MOD-in to pin 11 (pink) AF-out to pin 12 (light blue) |
|
| 1 audio line to soundcard line-in. From ACC #12 Lt Blue | 2 conductors to 1/8th″ CI-V plug | |
| 1 audio line from soundcard speaker out To ACC #11 Pink, via 50k PCB pot | 2 conductors to ¼″ KEY plug |
CI-V Interface with PTT and CW Keying, by G3VFP - Own Risk. Audio Lines not shown - see below.
Building this circuit will save you over $150.
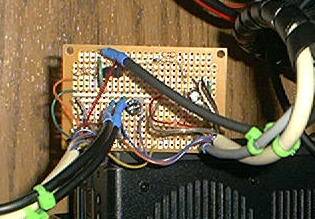
My second interface includes CI-V, PTT, KEY, and Soundcard.
If you don’t want CI-V interface, use this simple, non-isolated schematic in shacks with low RF density.
* Rx should probably be 600 ohms to match mic input of radio.
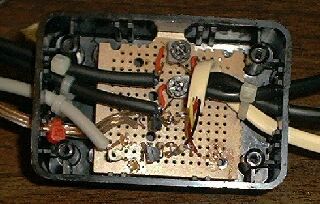
My first interface - does not include CI-V.
Disclaimer: The author assumes absolutely no responsibility, under any circumstances, for what the reader may do with this information. Building and connecting circuits, and performing adjustments or modifications, may damage your radio, void your warranty, and/or cause it to operate in violation of FCC rules and Type Acceptance, etc, unless you are very careful.
Continued…
Good day. Name is Andy ZS6ADY. RS232 have gone out with USB introduced only on laptops. Do you have a wiring circuit toe use USB now instead of the RS232 ?
Buy a USB to Serial port adapter. As soon as you plug it in the computer sees a RS-232 serial COM port. They are very common and cost very little. The best ones to look for have an “FTDI UART” chip in the adapter plug. FTDI is best supported by Windows, Mac, and Linux and have the full set of lines on the 9-pin connector. The computer and your software will see a COM port just as if it were built-in to the computer. Get the “pigtail” type with a short cord, so you do not strain the USB connector with the large DB9 connectors.
73, –kv5r
Thanks, will try that.
Looks like a neat project. My Rigblaster Advantage has died – I have gone back and forth with West Mountain Radio but do not wish to purchase another unit. My biggest problem getting on FT8 was all the RF getting into the shack. My antennas are in the attic due to HOA restrictions. So I have ferrite beads on everything. That is when I saw your comment “low RF density”. I have a Sabrent USB Audio Stereo Sound Adapter I would like to use. Has anyone made a PCB for you project?
Thanks, Gene WA5PWP
hello im hi3jcc have a ic706mk2g also have a signalink that work fine with ft8 and my probilem is that i would like to use rtty with n1mm have the radio and the signalink placking the radio and the signalink i put a siginal but no output
need help needa diagram on what to connect or do i have to make a difrent conection with the signalink thanks for your time
Sorry, I don’t know anything about N1MM, you need to use fldigi (or DM780) to send rtty, as audio, in usb mode. It will work through signalink like any other audio soundcard digi mode. It can also do rtty through the rtty connections in the acc jack but you need a winkeyer interface or something like that. Easy to just use audio tones rtty in ssb, it makes the same signal.
73, –kv5r
Hello.
My name is Petrika (Z34PEC) and I also have Icom 706MK2 radio.
I am making noise canceller from VK5TM’s site.
I can’t find information how to make output from my radio to noise canceller, sending a PTT signal to it, so noise canceller switch off when TX with 706.
Do you have any suggestion ?
Regards,
Petrika
Z34PEC
The wiring of the 13-pin Accessory jack is in the manual. The HSEND line sinks a few milliamps to ground when transmit. Usually external device needs an interface, like an NPN transistor switch, grounded emitter circuit, to switch higher current of external device and/or reverse the logic.
73, –kv5r
Oh, OK thank you. I re-post this question today because I did not see any info that you already reply. My friend made circuit but I do not know if it is efficient. How to send you schematics ?
Great work….
I Build mine the same from this site back 5 years ago and had no problems with it.
these days you can buy them much cheaper than it cost to build but then building learning and making things is all part of the Hobby
73s Lionel EX VK6FLMJ
Hello,
Just a quick question and I apologize in advance if youi have addressed this before.
I have an original model 706 and the encoder is not fuctional and has been removed from the control head. I do have the head and it is attached to my rig. Will your type of device allow me to control frequencies even though the encoder is not in the radio, or will I still need a functioning encoder in place??
Thank you in advance!
73,
Kit
K6KCC
Sandpoint, Idaho
Controlling frequency should work, but your problem will be setting up CI-V etc in the menus, and everything else that requires the main dial to set.
And the CI-V circuit above is sorta obsolete; you can get USB>CI-V dongles now for ~$25 (China) on ebay.
73, –kv5r
Hi,
I put together a circuit from the top diagram and it works with fldigi and HRD as far as controlling freq and receiving but it doesn’t activate PTT. Can you offer any troubleshooting advice?
Cliff
KD8YNZ
I donno, if you built it like the circuit it should work, mine does.
Just make sure your software is set to (a) use the same COM port for both PTT and CIV control, and (b) raises the RTS signal for PTT. Every program has different (sometimes confusing) settings for them.
Note that I never got it to work with FLDigi, because that program won’t use the same port for CIV control and hardware PTT, but all the other programs I’ve used (dozens, incl. HRD) will all do so.
Note also that most modern radios can PTT via CIV command but the 706 cannot, it must use hardware PTT on either the mic or acc jack.
Also to check and make sure the 706 in setup has “H-Send Sel” turned “on” else the radio won’t ptt via the acc jack.
To check the circuit, as you can see, the transistor should ground pin 3 of the acc plug when the computer raises the RTS line (db9 pin 7). Make sure you used a NPN transistor and the emitter is grounded.
Thanks much that was helpful. I will try it on some other software.
73
Cliff
Hi
I have a ICOM 706 MKIIG it has everything but the control head. So my ?? is can the rig be controled/used via software and a computer. I can build the CI-V cable and I have software.
TNX de KE7WMI
No, it won’t work without the control head. Won’t even turn on. Even if it would, the CI-V command set is pretty limited on the 706, so you couldn’t control the volume, most menus, etc.