
how to make better web-cam videos
Copyright © 2012 by KV5R. May. 27, 2012
Web-cams used to be of low quality, meant only for low-bandwidth video calls and chats, but nowadays you can get HD-quality web-cams that run 720p and even 1080p, such as the one I just purchased, the top-of-the-line Logitech C920. It has a glass auto-focus lens, stereo mics, hardware H.264/AVC encoding, and will record 1080p HD videos at 6000kbps. Hardware encoding means that you can record 1080p video on a modest computer, through a USB cable! Without hardware encoding in the camera, raw 1080p video is way too much data for a USB 2.0 connection, and requires FireWire or USB 3.0 connections and a very powerful (i7) computer.
With better web-cams comes the ability to make decent HD videos for Youtube and other purposes without having to buy an expensive HD camcorder. Making a video with a webcam and a computer requires that you be the actor/speaker, cameraman, director, producer, and everything else all at the same time, which is not so easy! It means to you have to look at both the screen and the camera, which is nearly impossible. You have to read your teleprompter (I used Mirrorscript Pro, the best free one, at that time; but see my jPrompter Teleprompter), watch your preview window to keep yourself framed properly, control the prompter with mouse or keyboard, control the capture software, and speak naturally — all while looking at, or very near, the lens.
Webcam videos have two common problems. The first is that they mount atop your screen, so while you’re looking at the screen, you’re not looking at the camera, and it’s very noticeable in the video. To fix that, you need to make a custom bracket of some sort to move the camera down into the screen so you can place your preview and prompter windows right above and below it. The second problems is lighting: usually the background is over-lit and the face is lit mostly by the screen.
In this article I will explain how I overcame both problems and then produced the accompanying video. First, I made a bracket to mount the camera five inches lower, then I ditched that and made an adjustable mount that hangs down from a shelf above the monitor. Then I made a light panel with about six feet of white LED flex ribbon. Then I tried a couple of 24-inch fluorescents, and finally (not in the video), I tried a couple of little 50-watt halogen video lights.
Webcam Mounts
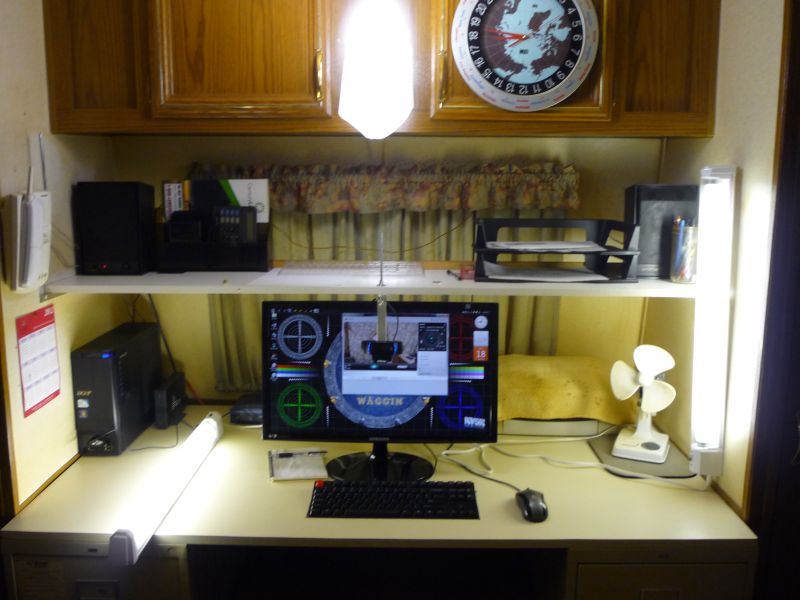
My office consists of a homemade desk packed into the end of a travel-trailer. As you can see, there’s no way to set up regular light stands and umbrellas beside the desk, so whatever I use must be on or above the desk, positioned for good face lighting.
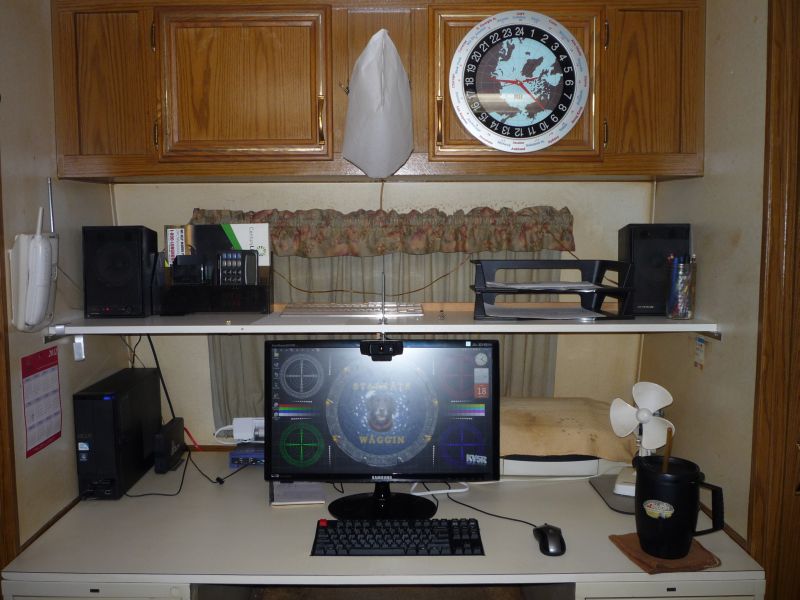
This is where we’ll be working
If you don’t have a shelf above your monitor, you’ll meed to make a bracket to lower the webcam. Measure your monitor, the amount of drop you need to place the camera at eye-level, and the webcam’s clamp. Get a piece of 1/16th by ¾-inch aluminum flat at the hardware store. Cut it to the needed length and file down the sharp corners and edges. Stick some padding to one side—I used the loop side of some Velcro. Bend it to your measurements. If you are still using an old CRT monitor, put only one bend in the top (straight back), and stick a piece of Velcro hook-side to the top-center of the CRT, else bend it as shown to slip over the top of your flat-panel monitor.

The simple slip-on bracket
If your webcam doesn’t have ¼x20 camera threads, but has the usual clam-shell clamp, bend the lower end of the bracket as shown. If you do have camera threads, make only one outward bend, drill it, and mount the camera with a very short (3-4 threads) ¼-inch screw.
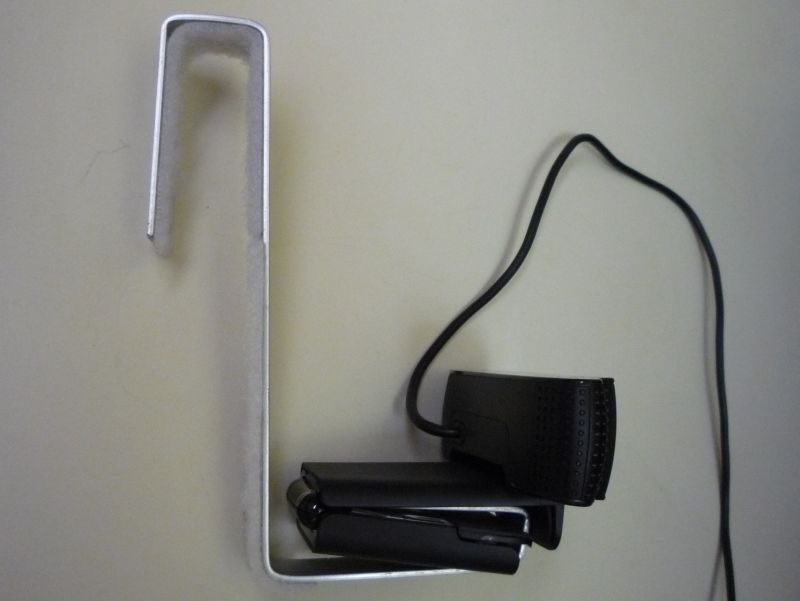
Camera on the bracket
Now slip the bracket on the monitor. Adjust the top bends as needed for a snug fit. Yes, it puts the camera right in the way, and you can’t just leave it there. This setup is only for making webcam videos.
Bracket and camera on monitor
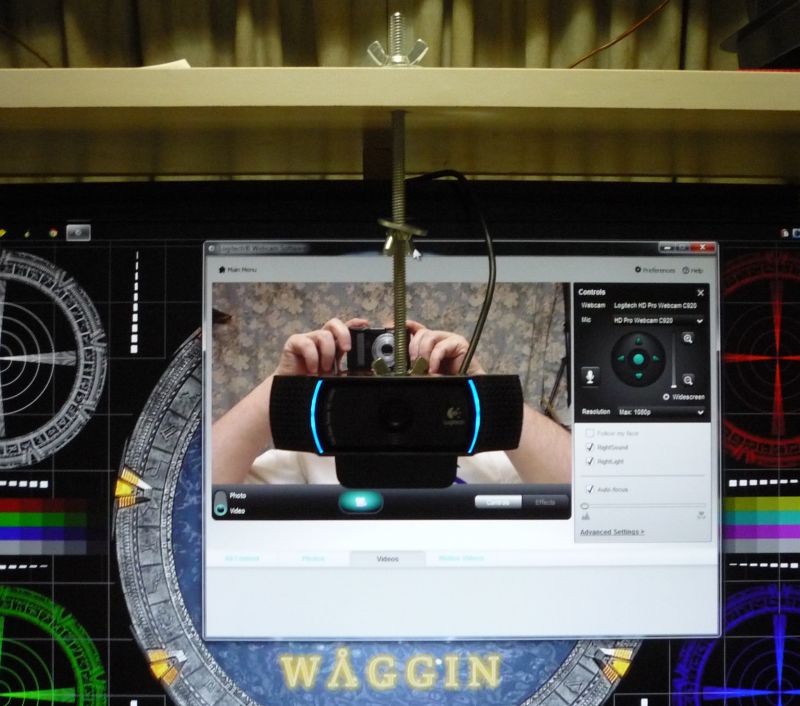
Now fire up your webcam capture program and position the preview window so that your eyes are behind the camera. If also use a teleprompter, position it so the top line of text is just under the camera. Be sure to close or minimize any other windows, and use a dark desktop, so you won’t light your face with the monitor. Set your teleprompter to have gray text on a black background, and use it to cover most of the preview window, else you’ll get reflections in your glasses (if used).

Position window so you can look at the camera while watching your framing
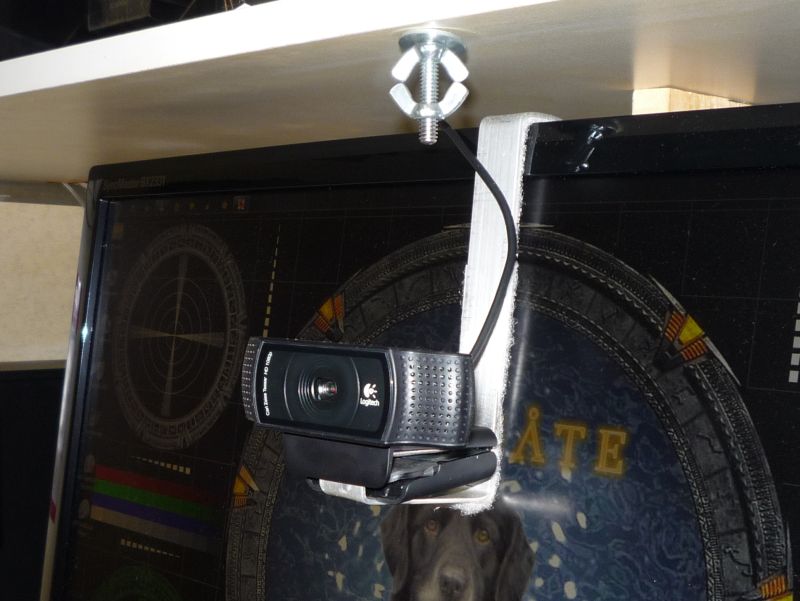
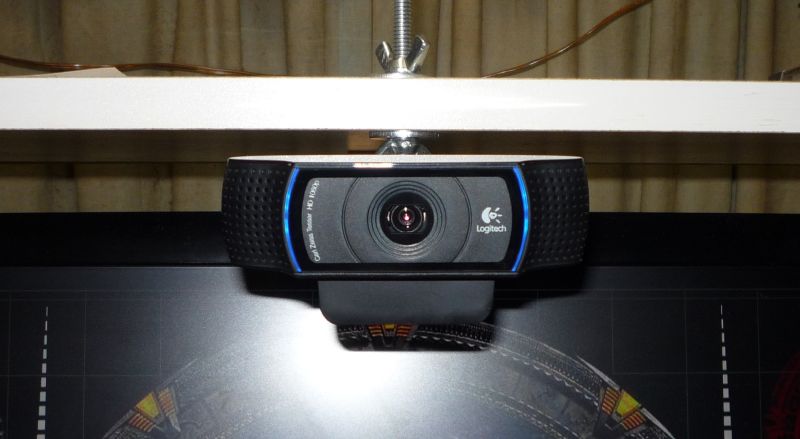
If you have a shelf above your monitor (and you should—it’s very handy), you can make an adjustable mount using about 7-8 inches of ¼x20 all-thread rod with three nuts and washers. To prepare the all-thread, cut it cleanly with a hacksaw, then grind or file the ends to make clean starting threads. Also, since all-thread is usually galvanized, you’ll need to brush all the treads well using a bench grinder with a wire wheel, so you’r nuts will spin easily. If your webcam does not have camera threads, you can drill the clam-shell clamp on a small drill-press (7/32″ bit) then tap it for ¼-20. Use the drill-press, with the drive belt removed and quill spring released, to hand-tap the camera, else you'll never get it straight and your videos will lean.
Webcam shelf mount
Since making these photos, I have drilled and tapped the top half of the clam-shell clamp so I can mount it from above with the clam-shell folded up.
In the up position
Do not over-tighten the nut on the camera or you’ll risk damaging the camera threads, particularly if you’ve tapped them into plastic. Just get it snug enough so the camera doesn’t easily move. Also, make sure you drill the hole in the shelf straight, and wobble it a bit, so you can adjust the rod’s angle a little after snugging the wing-nuts against the washers. Take exact measurements to position the shelf hole exactly in the center of the monitor. Also, make sure to position it fore-and-aft so the webcam doesn’t hit the screen when in the down position.
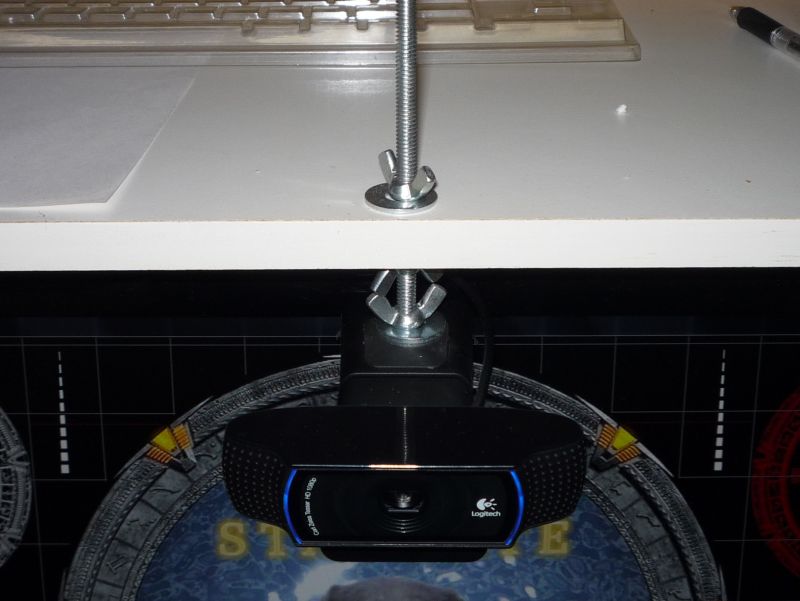
In the down position
LED Webcam Lights
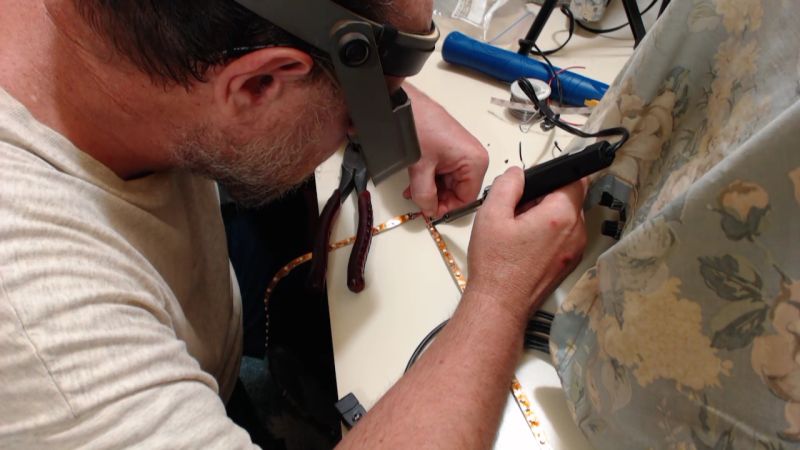
I found this 16-foot roll of LED Flex Ribbon on Amazon for $14. It runs on 12 volts DC, and the full 16 feet uses 24 watts, which is 2 amps at 12 volts. That comes out to 125 milliamps per foot, and I used a bit under 6 feet, which is 750ma. I powered it with a 600ma wall-wort that I had already, and it gets a bit a warm but works okay. You can cut the ribbon between every third LED (it shows you where to cut) and then either purchase connectors or solder wires onto it, using small insulated wire, like AWG #22-24.
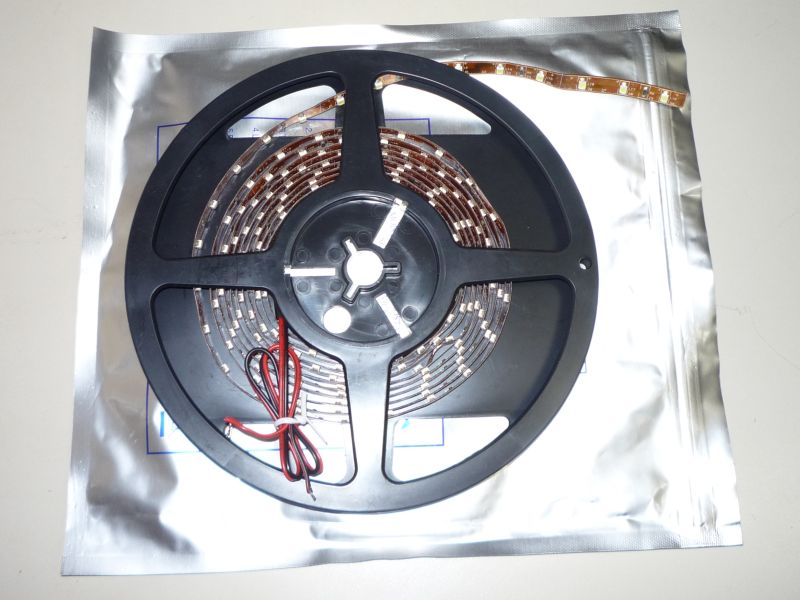
Roll of LED flex ribbon (click to shop)
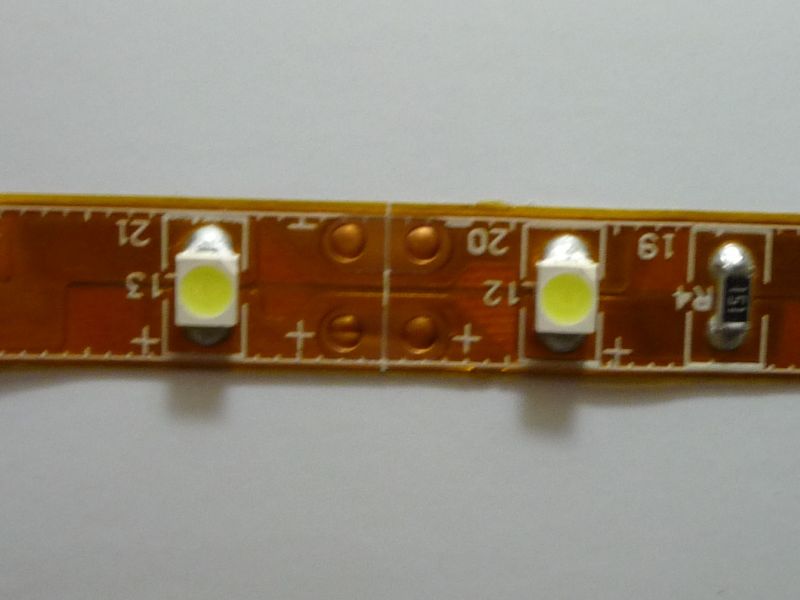
Cut between the solder pads
Soldering 1-inch jumpers to make a corner
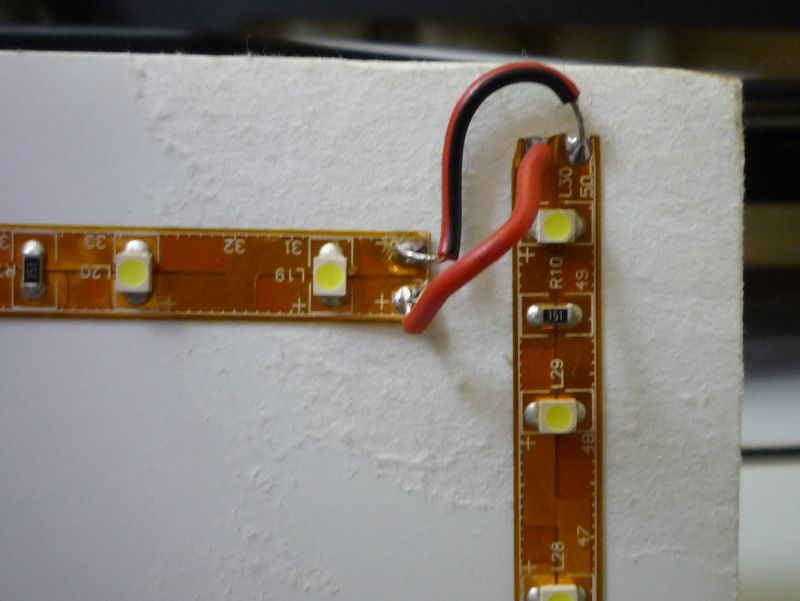
Corner connection
Since I live in a trailer, I have 12-volt lights on the ceiling. They are very harsh and the bulbs last about 5 hours and use too much power. I put about 11 feet of LED flex ribbon on the ceiling and tied it in to one of the 12-volt lights, using its switch. Now I can light more than half of the trailer with about 16 watts! And it makes a nice, evenly-spread light without shadows.
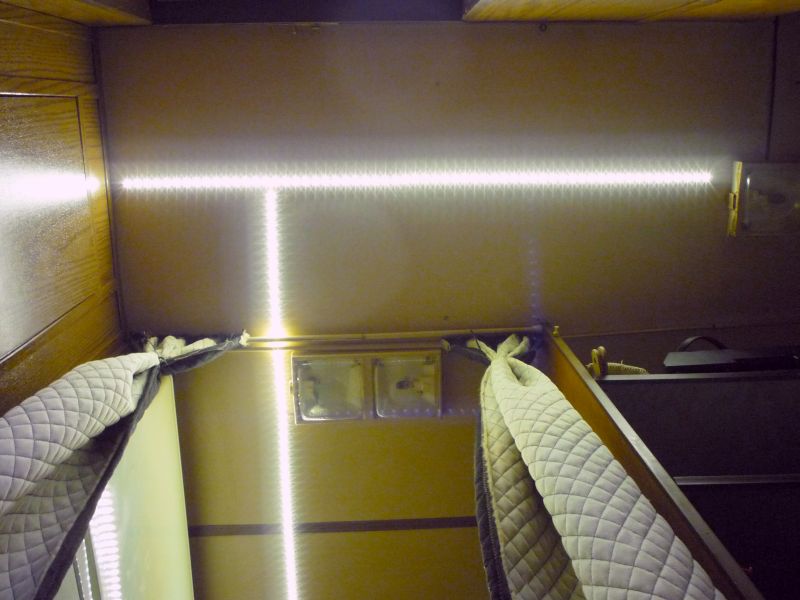
LED strip on ceiling
You might not want this stuff showing on your ceiling in a nice home, but it would be great for pantries and closets. Nicer homes use it for cornice lighting, and it is also used commercially in display cabinets and storefront displays.
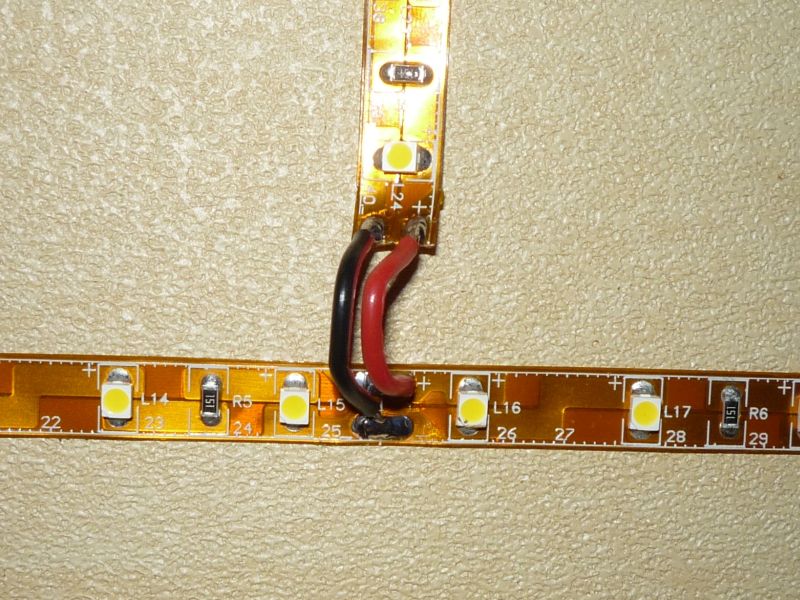
Tee connection
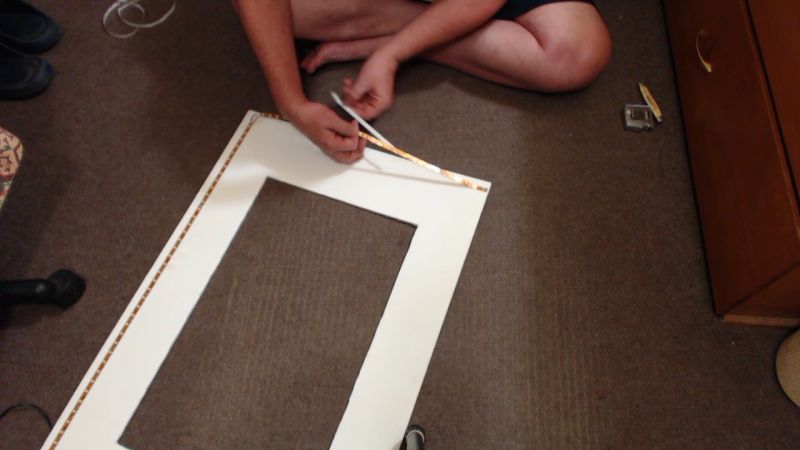
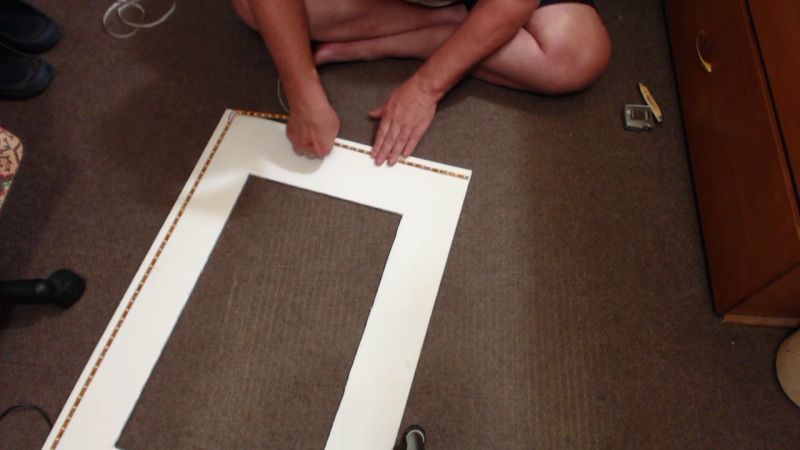
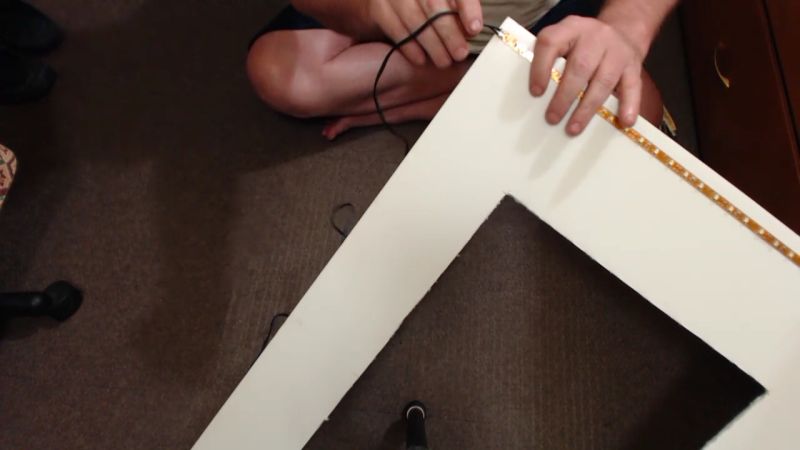
But back to the project at hand. I wanted to try some LED flex ribbon to make a light panel. I used a 20x30-inch sheet of FoamCore, and ran LEDs near three sides. As you will see later, I should have used a larger sheet of FoamCore, because at this size, the LEDs reflect in my glasses. I recommend you either buy a larger FoamCore, or tape two 20x30 sheets together (with clear packing tape) and make your LED panel 30x40 inches. One that size will need 1.25 amps at 12 volts, so you’ll need a power supply larger than a wall-wort. Cut out the middle to fit your monitor. Cut your three pieces of LED flex ribbon at the next-shorter cut-point and solder the corners together with small, short wire jumpers. Then solder on the power wires. Then carefully stick them to your FoamCore.
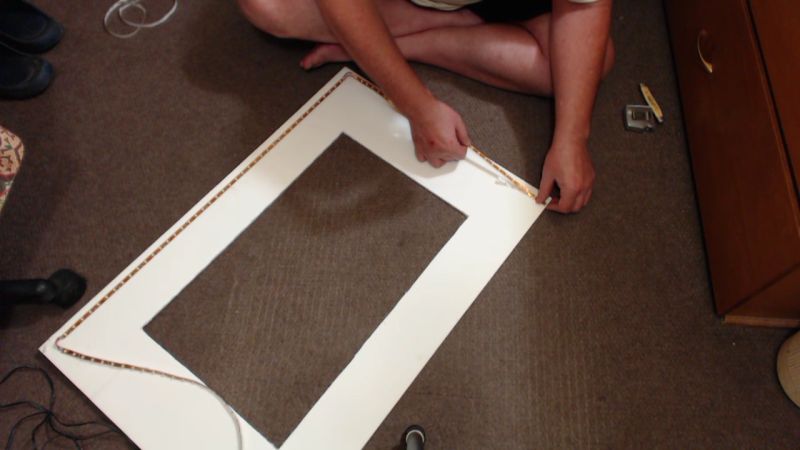
Peel back a few inches of the backing and start sticking.
The flex ribbon comes with 3M double-stick backing, and when it touches something, it’s stuck! Make sure you peel off the protective backing paper strip in stages, else it’ll stick before intended. Stick the first inch or so, then stick the rest while stretching the ribbon a little to remove any wrinkles.
Don’t peel all the backing at once; do the start…
…then the middle…

…then the end…

…press it down well.
You can attach the power at any solder-point on the ribbon. I should have soldered it one point up from the corner, because connecting at the end tends to pull and peel the paper off the FoamCore.
Power connection
This is the power supply I used. It is 600ma and will run 5-6 of the ribbon. It has a voltage selector so I can turn the lights down 2-3 clicks if needed. If you build the larger version, you’ll need to purchase a power supply with suitable amperage. LEDWholesalers.com has them for ~$25, or you might have an old laptop or printer power supply laying around—just measure it under load and make darn sure it really puts out near 12 volts (many such supplies are ~18V). Do NOT use a battery charger—they are not filtered and your LEDs will flicker, ruining your video with harmonic lines.
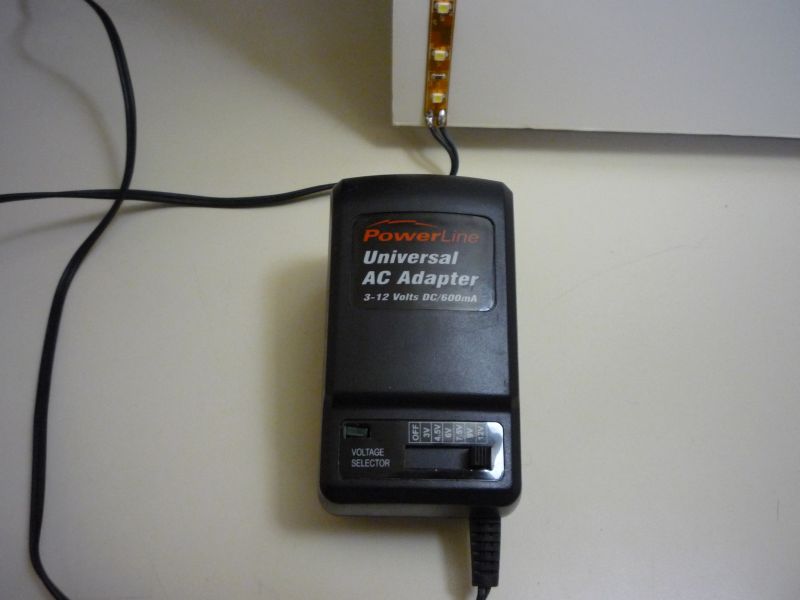
600 milliamp power supply
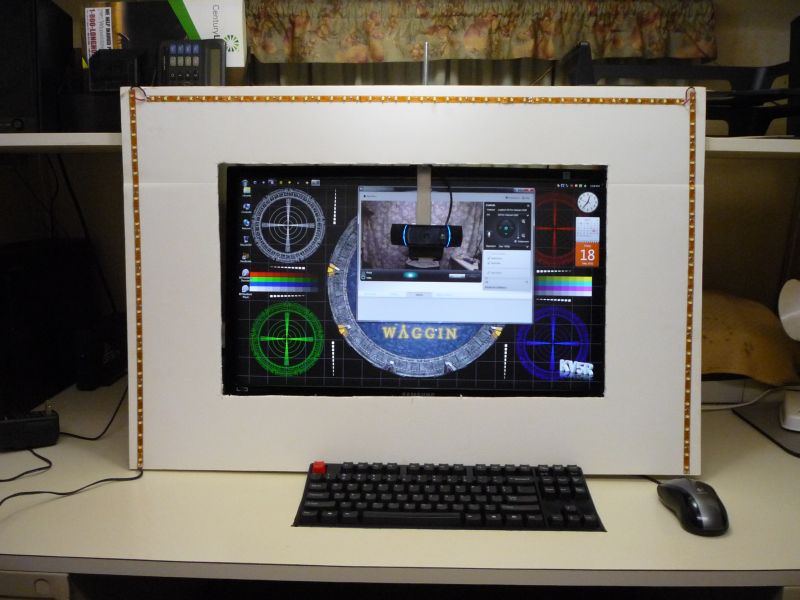
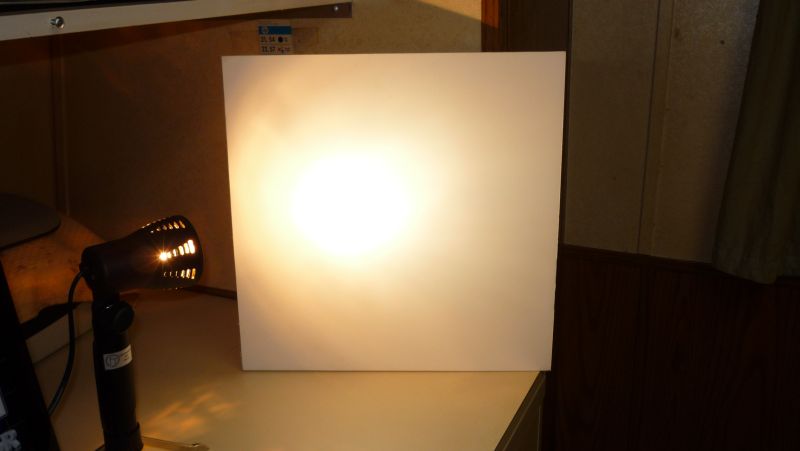
The finished panel, in place
My 20x30 size presents two problems: (1) I can’t quite see the monitor, and (2) they reflect in my glasses. That’s why I recommend you built it 30x40.
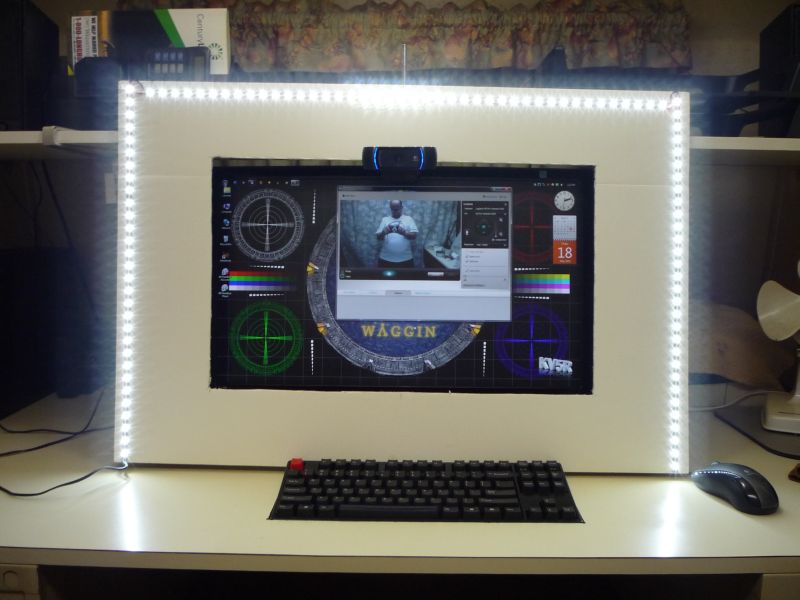
LIGHTS ON! WOW! That thing is BRIGHT!
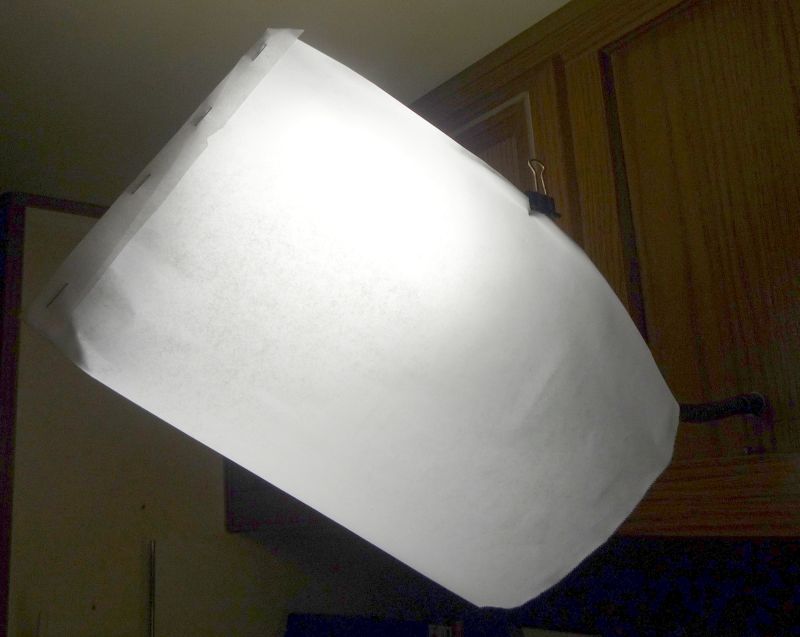
The main light that use on my office is a 45-watt, 5500K, 91CRI full-spectrum video light from ALZO Digital. It sits about three feet above my keyboard, and has a diffuser made of baker’s parchment, which is a lot whiter and more translucent than regular copy paper. Also, being baker’s parchment, it will withstand 500°F and so can be used safely for light diffusers—though I wouldn’t try it with halogen lights.
My office light
The light above is not so good as the only light for webcam videos. For videos, you need light from at least three sources to fill in the shadows.
Fluorescent Fill Lights
You can also use a couple of small (18-24-inch) fluorescent lights as fill lights. The advantage over the LED panel is that you can move them around separately and get your fill lighting the way you want it—and out of your glasses. The disadvantage is that if you use the stock bulbs, they are too greenish, and you need to spend extra to buy full-spectrum tubes. I bought the following lights at Walmart for under $10 each, with the stock (greenish) tubes.
Fluorescents as fills
The First Video
Produced with the Logitech C920 and PowerDirector 10.
Better in 720p HD, full-screen…
Table-top Video Lights
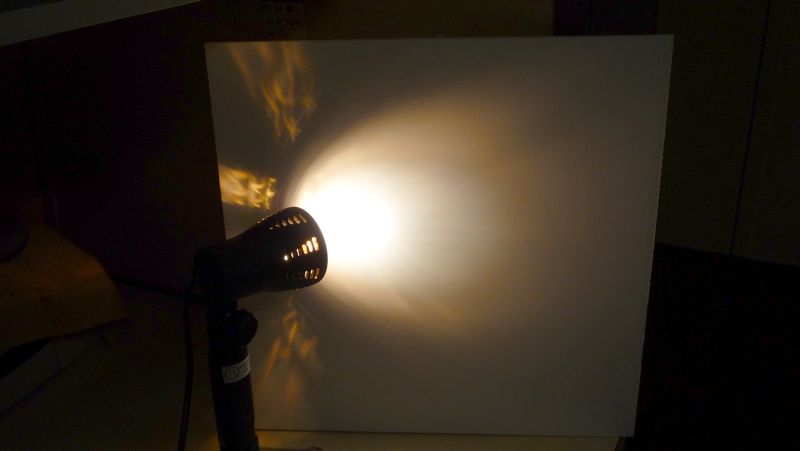
I then tried these small video lights. They are made for lighting small video tents, like you’d use for photographing jewelry or something. These use GU-10 50-watt halogen photo lights. I got them with a photo tent kit that includes the lights, the tent, and a table-top tripod on sale for $29 on-line. The big disadvantage is that the light comes from a small point and makes harsh shadows and blinds your view, so you’ll need to bounce them off some white paper or FoamCore as reflectors.
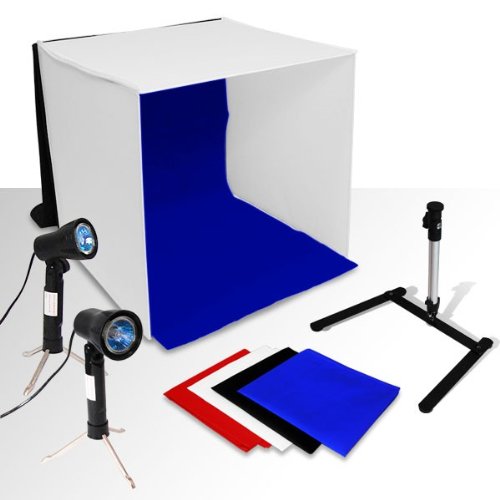
LoadStone Studio Photo Studio Photo Light Tent Kit
(click here to shop)
Later, I made some reflectors out of FoamCore, and then made another video.
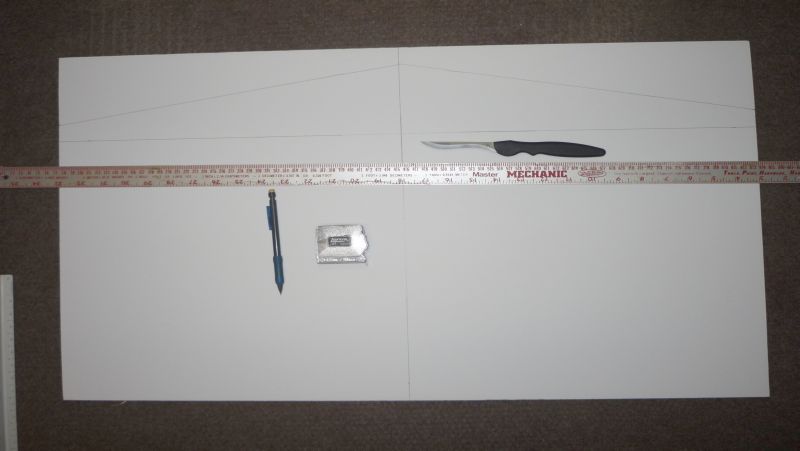
Mark the 20x30 foamcore across the middle and 5 inches from one long edge.
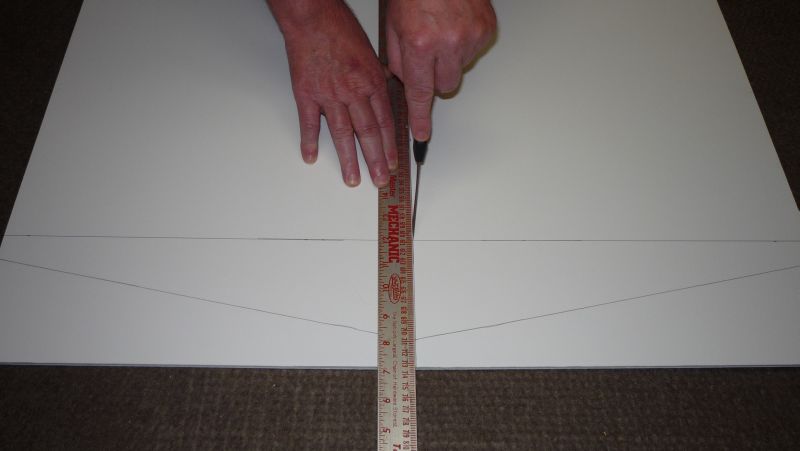
Angle the diagonals from about 2 to 3 inches, so they’ll lean back a little.
Cut part-way through with a sharp knife…
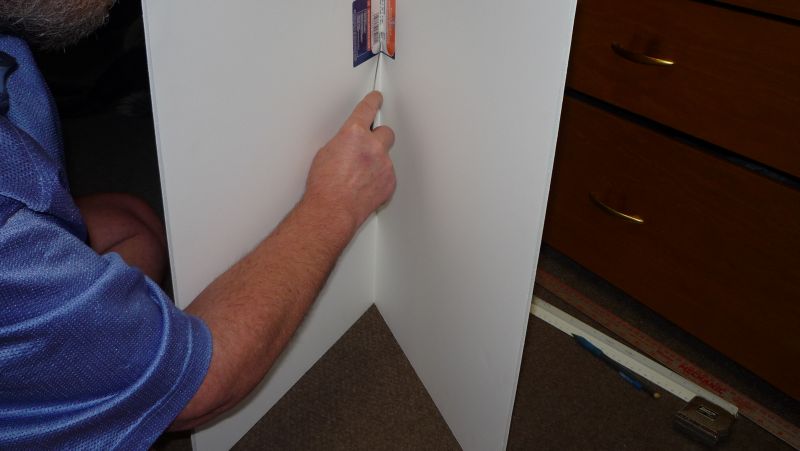
…then bend it sharply and cut through the back side.
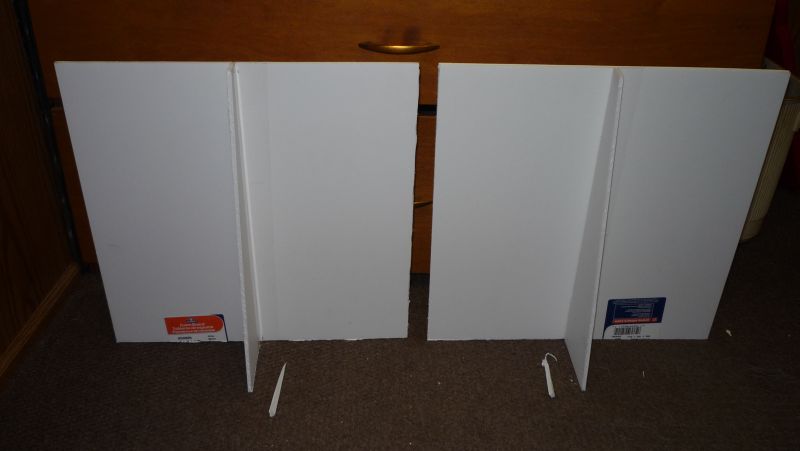
Attach the stands for the reflectors with packing tape on one side only,
so the stands can fold flat for storage.
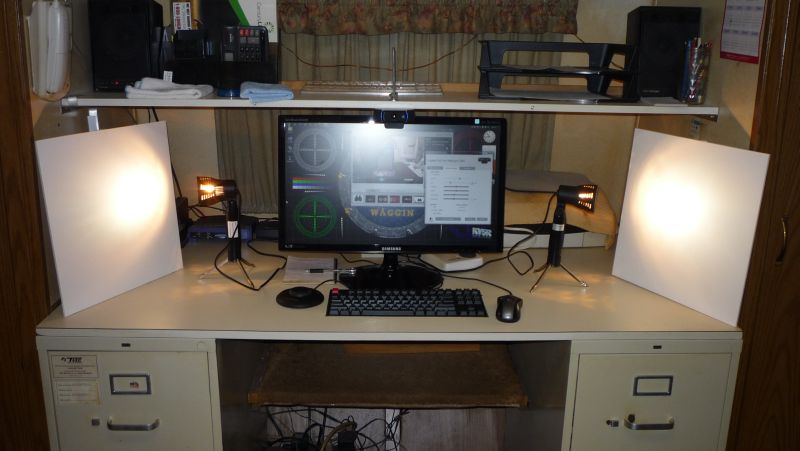
Set them up something like this.
Move them in close for a sharper fill…
…or move them back some for a softer fill.
The Second Video
This is my first real full-HD video. If you have the bandwidth (5+Mbps) and a 1080p HDMI monitor, try it at 1080p full-screen!
Produced with the Logitech C920 and PowerDirector 10.
Better in 1080p or 720p HD, full-screen…
Notes
- I did have to manually correct the white balance, both while capturing, and later editing in PowerDirector, as I changed lights. The stock fluorescents are greenish, and the “white-white” LED ribbon is a little too bluish. I should have used the “warm-white” LED ribbon, which has lower color temperature.
- The LED light panel is a neat idea, but the two fluorescents are more practical, since you can adjust their positions to get the best fill effect.
- Another good idea might be to just use two 27-watt, 5500K ALZOs in clamp reflectors, clamped to the shelf, well to the sides. When you buy clamp lights, take your CFL along to make sure the base will fit in the reflector (most will not).
- The two little 5000K studio lights gave the best color rendition, but must be bounced to diffuse the light. You can see the effect in the secod video above.
See also: DIY Photo Video Lights page for homemade soft-boxes for your desk. These take up a lot of room, but work very well for webcam fill lights. For DIY soft-boxes that will mount on light-stands, see DIY Photo Video Light Soft-Boxes, which are my pyramidal reflectors made for standard photo light sockets and CFL video bulbs.
—KV5R
hey this is fluffy puff
Excellent documentation! I have recently bought a C920 for some indoor video recording purpose and this will help me very much.
I am also interested in your computer desktop 🙂 Is it just a wallpaper or do you have some customized theme? Which OS and theme do you use? Please let me know 🙂
Using W7; the theme is W7’s default; and the desktop is just a wallpaper I made.
Glad you liked the article. Thanks for stopping by!
Best Wishes,
–kv5r